An offline Raspberry Pi server
This guide shows you how to configure a Raspberry Pi as a local Wi-Fi hotspot serving Kolibri.
There are several varieties of operating systems for Raspberry Pi. This guide is intended for and tested on Raspian, the most popular choice of OS, based on Debian.
Prerequisites

Raspberry Pi 3: An internal MicroSD card is used for the base system, and an external storage media for contents (for instance a 64 GB USB flash). We recommend that you have an ethernet cable for online connectivity while installing and fetching contents for Kolibri.
- Raspberry Pi Model 3+
- Formatted MicroSD Card > 4GB (64 GB recommended or attached USB storage)
- Card reader for a laptop or computer to write to the MicroSD card
- Latest Raspbian Stretch OS .img file
- Internet connectivity (for setting up the device)
Getting started guides
This guide provides a step-by-step setup of Kolibri but does not try to explain basic concepts for your Raspberry Pi. If you are new to the system, you are encouraged to read the official Getting Started guide for basic knowledge about setting up your device.
In doubt about which Raspbian to choose? We recommend using Raspbian Lite if you are comfortable with an environment that only has a terminal and no graphical user interface. Using the desktop version will consume more CPU, memory and electricity. Finally, you do have the option to switch off the desktop environment once you have finished setting up the device.
We install Kolibri as one of the very final step. But please read and complete the prior steps.
Setting up the SD card
The following commands work on Linux/macOS for setting up the .img files provided. You will also need to know the device node for the SD Card reader. On Linux, this is typically /dev/mmcblk0 for the 0th card in your card reader.
# Unpack the .zip into memory and write it to <device node>
unzip -p /path/to/raspbian-stretch-lite.zip | sudo dd of=/dev/mmcblk123 bs=4M conv=fsync
Tip
Read the official guides for setting up your card: Copying .img files
Tip
Select your MicroSD card based on other people’s experiences and technical benchmarks. For more information, read this Community Forums thread.
Updating the software
After installing and starting up your Raspberry Pi, it is recommended that you upgrade all the software on the device:
sudo apt update
sudo apt upgrade
sudo reboot  # Ensure that updates are active
Updating the firmware
Run sudo rpi-update to update the firmware. Nothing in this tutorial necessitates this, but it’s always recommended because hardware issues may be solved over time and performance improved. You cannot replicate this by copying MicroSD cards, you would have to repeat this step for every new Raspberry Pi device that you are installing.
General system configuration
Run sudo raspi-config for the general setup options such as keyboard layout, timezone etc.
Warning
Always change your password after setting up device. The default password for the user pi is raspberry.
Setting up a hotspot
The Raspberry Pi 3 has an internal Wi-Fi adapter which can serve as an access point, thus giving other devices the ability to connect to the Raspberry Pi through Wi-Fi. In this case, we call the Raspberry Pi a hotspot.
We assume that you will need to connect the Raspberry Pi to the internet both before and after setting up the hotspot. The easiest way to achieve this is through the Raspberry Pi’s ethernet cable connection. In this way, you don’t have to disable and enable the Wi-Fi configuration each time.
- The device can be setup such that it automatically uses the ethernet interface as a gateway to the internet when a cable is connected.
- If you need to connect to the internet through Wi-Fi, you will have to disable the hotspot and connect through the normal network management.
Installing hostapd and dnsmasq
In order to serve clients on a local Wi-Fi hotspot, you need the Raspberry Pi to act as:
- an access point
- a DHCP server
- a DNS server
The access point is handled by the package hostapd and the DHCP and DNS server are both available through the dnsmasq package. We will install and configure both in this section. For more detailed information, see the online Raspberry Pi docs.
sudo apt install dnsmasq hostapd
Setting a static IP
Firstly, the server’s Wi-Fi interface wlan0 needs to have a predictable IP address and not try to obtain it from another server. We call this a static IP.
It is defined in the configuration file /etc/dhcpcd.conf, which you can edit through the below command.
sudo nano /etc/dhcpcd.conf
Use the arrow keys to navigate to the end of the file, then copy and paste the following text and press CTRL + X to save and exit.
interface wlan0
    static ip_address=192.168.4.1/24
    nohook resolv.conf, wpa_supplicant
Then, make your current local DNS available
After installing the new hostapd and dnsmasq packages and setting a static IP, you should reboot the system.
sudo reboot
After rebooting, you can ensure that your system is running with the static IP address by running the command ipconfig and reviewing that wlan0 has the new IP address printed. It should contain this output (notice the IP address):
wlan0: flags=4163<UP,BROADCAST,RUNNING,MULTICAST>  mtu 1500
        inet 192.168.4.1  netmask 255.255.255.0  broadcast 192.168.4.255
        inet6 fe80::e02e:4991:29ac:f076  prefixlen 64  scopeid 0x20<link>
Configure DHCP and DNS
We create a new configuration file for dnsmasq in the appropriate location and start editing it:
sudo nano /etc/dnsmasq.d/hotspot.conf
Copy and paste the following text, then press CTRL + X to save and exit.
# Gateway + DNS server
dhcp-option=3,192.168.4.1
dhcp-option=6,192.168.4.1

# Let the Raspberry Pi resolve to all DNS queries
address=/#/192.168.4.1
Warning
These settings override the possibility to connect to an online source using the Wi-Fi. It is still possible to connect to the internet through the cabled ethernet, however you will need to configure a DNS server manually every time you reboot the device. Put the IP of your DNS provider in /etc/resolve.conf. If you don’t know it, you can use Google’s OpenDNS address 8.8.8.8 as in this example:
echo "nameserver 8.8.8.8" > /etc/resolv.conf
Configure the access point
You will need to write a configuration file with information about your local Wi-Fi network.
sudo nano /etc/default/hostapd
In the file, copy in the following configuration to specify the name of the network, its Wi-Fi channel (frequency) and bandwidth mode (we recommend 2.4 GHz ‘g’ mode). Set hw_mode=a to use 5 GHz. Press CTRL + X to save and exit.
interface=wlan0
driver=nl80211
ssid=Offline Library
hw_mode=g
channel=7
wmm_enabled=0
macaddr_acl=0
auth_algs=1
ignore_broadcast_ssid=0

# Remove the '#' in front of below lines to set a password 'Password'
# wpa=2
# wpa_passphrase=Password
# wpa_key_mgmt=WPA-PSK
# wpa_pairwise=TKIP
# rsn_pairwise=CCMP
Next, edit /etc/default/hostapd to enable the configuration file that we have just written:
sudo nano /etc/default/hostapd
At the bottom of the file, add the following text and press CTRL + X to exit and save.
DAEMON_CONF="/etc/hostapd/hostapd.conf"
Finally, start the access point system service hostapd and the DHCP and DNS server dnsmasq:
sudo systemctl start hostapd
sudo systemctl start dnsmasq
Setting up a “Captive portal”
You don’t have to set up a “Captive Portal”, but it’s a good idea, since the behavior will make the user experience better. Users won’t have to guess the location (hostname / domain) of services on the Raspberry Pi, and many devices support displaying your welcome page automatically upon connecting to the Wi-Fi.
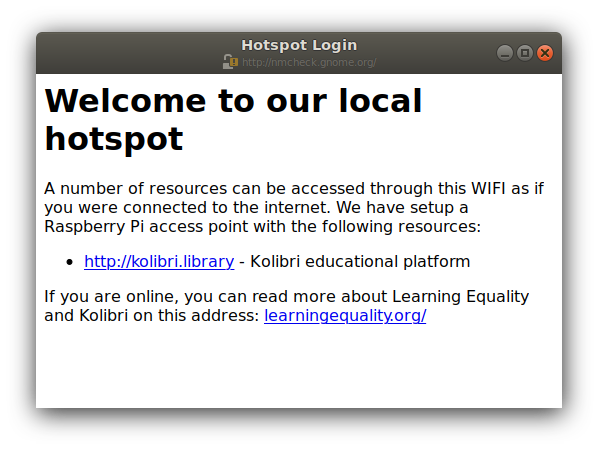
This type of dialogue will appear on many devices when they detect a successful Wi-Fi connection without an internet connection.
In the previous step, we have configured the Raspberry Pi to tell devices on the local offline hotspot that whatever resource they request such as http://domain.com, it should resolve to the Raspberry Pi’s static IP address 192.168.4.1.
Firstly, install the HTTP server nginx:
sudo apt install nginx
Then, you need to edit and adapt your default Captive Portal page. You can use this template.
Copy the contents of the template by editing /var/www/html/index.html:
sudo nano /var/www/html/index.html
You can use CTRL + SHIFT + V to paste text in the terminal. Press CTRL + X to exit and save.
Installing Kolibri
Firstly, follow the main instructions for installing Kolibri on Raspberry Pi.
After completing the installation, you can make kolibri available on port :80 in addition to :8080. This will make it possible to type kolibri.library in the browser location bar, and because of our captive portal, it will display.
To enable you Nginx web server to serve Kolibri, edit /etc/nginx/sites-available/kolibri and add a so-called virtual host:
sudo nano /etc/nginx/sites-available/kolibri
Copy and paste the following into the configuration file:
server {
  listen 80;
  listen [::]:80;

  server_name kolibri kolibri.library;

  location / {
    proxy_pass http://127.0.0.1:8080;
  }
}
Press CTRL + X to exit and save. Then enable the new configuration by linking it into the directory of enabled virtual hosts:
ln -s /etc/nginx/sites-available/kolibri /etc/nginx/sites-enabled/
Attaching USB storage
Many people have a 4 GB or 16 GB MicroSD card that came along with the Raspberry Pi. In order to have more content, such as the full Khan Academy, you may want to attach a USB storage media – a flash device or a hard drive.
Tip
Moving content: If you have a USB source for additional storage, you can use the kolibri manage movedirectory command or create your own symbolic links to have the data folder located elsewhere.
Using the built-in management command:
# Stop kolibri
sudo systemctl kolibri stop
# Move the data
kolibri manage movedirectory /path/to/your/external_drive
# Start kolibri
sudo systemctl kolibri start
Or using symbolic links, you need to start and stop Kolibri and to set the permissions correctly:
# Stop kolibri
sudo systemctl kolibri stop
# Relocate the full Kolibri data and configuration user folder
sudo mv /home/pi/.kolibri /your/external/media/kolibri_data
# Ensure that the kolibri system service user owns the folder
sudo chown -R pi /your/external/media/kolibri_data
# Restore the original location with a symbolic link
sudo ln -s /your/external/media/kolibri_data /home/pi/.kolibri
# Start kolibri
sudo systemctl kolibri start
Other tips
Locale warnings
You may encounter warnings like Can't set locale; make sure $LC_* and $LANG are correct! while installing software about the system locale. Typically, these are missing UTF-8 locales for your chosen system locale. These can be fixed by running this from command line:
# Run this and select the appropriate missing UTF-8 locales
sudo dpkg-reconfigure locales
Disabling the graphical desktop
Once the Pi device is deployed, the desktop environment may no longer serve a purpose. It can safely be disabled. This saves computer resources and electricity. Use the following steps to disable or enable the desktop:
# Run the configuration and navigate to the Boot option, selecting "Console"
sudo raspi-config
Saving your image for replication
Once you like the setup and you may want to deploy several Raspberry Pis to different schools, classrooms etc.
Tip
Using the same Wi-Fi SSID (in this tutorial, we called it Offline Library) is recommended if you are setting up several Raspberry Pis in the same area. But you should configure them on different Wi-Fi channels. Separate them by a count of 2, this will avoid radio frequency overlaps.
Warning
Replicating the Kolibri device registration will make online synchronization unpredictable (fail).
Kolibri has a sync’ing mechanism whereby user data can synchronize from device to device through an online service. This happens automatically when Kolibri detects an internet connection. You need to unregister (deprovision) your device before copying the SD card and external storage:
kolibri manage deprovision
After replicating your SD card and external storage device, you need re-register the Kolibri installation on each device. This can be done without removing the installed data:
# This will ask you questions
kolibri manage provisiondevice
Future steps
Kolibri is under development with regards to optimizing performance on Raspberry Pi. We are adding support for multiple CPU cores, and since the Raspberry Pi has 4 of these, it will benefit greatly. Tests indicate almost a factor 4.
This work will be released in a future package targeting a pre-configured UWSGI and Nginx implementation, which will be possible to add by replacing the package of this tutorial with the new package. We will add a release note and update this tutorial accordingly.
You may also want to install other services such as Kiwix. If you have followed this tutorial, you can install Kiwix alongside Kolibri by downloading the kiwix-serve package and adding an Nginx configuration similar to the one we added for Kolibri.
The Wi-Fi antenna and chip in the Raspberry Pi do not have capacity for many clients. Thus, you may also want to connect a stronger Access Point. If you intend to do this, you should modify the DHCP server (dnsmasq) to listen to the eth0 device instead of wlan0, switching off the Wi-Fi by removing hostapd.
There are several bottle necks in this setup, but we recommend that you focus on the strong sides of the Raspberry Pi platform: It’s low-cost and uses little electricity. Perhaps you can connect it to solar power? Perhaps you can implement a good system for distributing software updates and replacement parts?
Tip
Using a Raspberry Pi is subject to many tips and tricks not described here - please share your performance experiences in the Community Forums.