Install Kolibri
See the Kolibri changelog here to review specific changes in each version of Kolibri. Documentation for previous Kolibri versions are available here.
Hardware requirements
To install Kolibri on a device that will act as a server, check the hardware requirements first, and then follow the procedure for the operating system on your device.
Tip
Below you will find general recommendations regarding hardware requirements to run Kolibri. To read more detailed information and find out examples of hardware setups that have been implemented by our users, download the full Kolibri Hardware Guide and examples of Hardware Configurations for Kolibri (PDF documents).
Servers
Minimum hardware requirements to run Kolibri as a server:
- 500 MB RAM (1 GB recommended)
- 500 MHz CPU (1 GHz recommended)
- Hard drive space depends on the size of the content channels you intend to import from Kolibri Studio or a local storage device.
If you have a facility with less than 30 computers, a device as simple as a Raspberry Pi is known to work fine as a server.
Clients
Very old desktops and very low-power computers can be used as client devices to access Kolibri. For instance, some implementations are known to use first-gen Raspberry Pi as desktop computers.
It is always a good idea to do a practical test, but when you want to implement Kolibri, usually it’s not necessary to scale your hardware. The main requirement is that your system needs a video card and driver that can play the videos.
Windows
Compatibility
- Supported: Windows 7, 8.1 and 10, with IE 11+, Chrome or Firefox
- Not supported: Windows XP cannot be used to install Kolibri server, but could potentially work as a client device if the browsers are as up-to-date as possible.
Install
- Download the Windows installer for Kolibri version 0.11.
- Double-click the downloaded
.exefile. - Select the language for the installation.
- Python 3 installer is included, confirm the installation or the upgrade to proceed.
- Follow the rest of the instructions in the Kolibri installation setup wizard.
- Once the installation finishes, Kolibri will auto-start and open in the default browser on your computer at http://127.0.0.1:8080. This may take a moment, so please be patient.
- Proceed with the Initial Setup of your facility.
Warning
Windows firewall will prompt you to allow the Python process needed to run Kolibri. Click Allow access to accept and proceed.
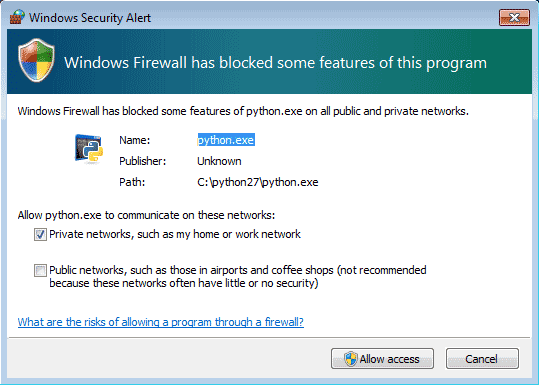
Allow the Python process needed to run Kolibri.
Uninstall
- Open the Windows Control Panel.
- Select Programs and Features option.
- Select Kolibri from the list of programs.
- Click the button Uninstall/Change and follow the instructions.
Upgrade
To upgrade Kolibri, follow these steps.
- Download the new version of Kolibri Windows installer.
- Double-click the downloaded
.exefile. - Follow the instructions in the installation wizard window.
- Once the installation of the upgrade is finished, Kolibri will auto-start and open in the default browser on your computer.
- Go explore the new and improved Kolibri features!
Debian/Ubuntu
Compatibility
Debian/Ubuntu 14.04 and up - anything that’s not end-of-life
Warning
Django 1.11 used in Kolibri isn’t compatible with Python 3.7. You will need to downgrade to Python 3.4-3.6, set them to run in parallel, or use Python 2.7. For a workaround and more details read this thread.
Install from PPA repository
Use the following commands in Terminal to add the PPA and install Kolibri:
sudo apt-get install software-properties-common python-software-properties
sudo add-apt-repository ppa:learningequality/kolibri
sudo apt-get update
sudo apt-get install kolibri
Install from a .deb file
The advantages of downloading a .deb file is the portability: you can copy the file from device to device and install Kolibri without internet access.
Download the latest .deb installer for Kolibri version 0.11, or have it copied to your local drive.
Run this command from the location where you downloaded the
DEBfile:sudo dpkg -i kolibri-installer-filename.deb
Wait for the installation to finish and run this command to start Kolibri:
kolibri start
Note
If you choose to install Kolibri as a system service, you will not need to start it manually.
When the command finishes, open the default browser at http://127.0.0.1:8080 and proceed with the Initial Setup of your facility.
Uninstall
- Open Software on Ubuntu and locate the Kolibri. Press Remove.
- Or from the command line:
sudo apt-get remove kolibri.
Upgrade
When you use the PPA installation method, upgrades to newer versions will be automatic, provided there is internet access available.
To upgrade Kolibri on a Debian device without internet access, bring the updated .deb file and follow the same steps as in Install from a .deb file.
Changing the owner of Kolibri system service
The system service is the script that runs Kolibri in the background when your system boots on Debian-based distributions.
You may need to change the system service to run with the permissions of a different user account. Prior to v0.10, kolibri user account was the owner of the system service, while from v0.10 and later, desktop user’s account is preferred, in order for Kolibri to access the local USB storage.
To change the system service owner, you need to change the configuration of the system service: move the .kolibri data folder (containing channels, databases etc.), and assign owner permissions to the new user. Follow these steps.
# Stop Kolibri
sudo systemctl stop kolibri
# Move data to your desktop user:
sudo mv /var/kolibri/.kolibri /home/$USER/.kolibri
# Change ownership
sudo chown -R $USER /home/$USER/.kolibri
# Change the username configuration
sudo sh -c 'sudo echo -n $USER > /etc/kolibri/username'
# Start Kolibri again
sudo systemctl start kolibri
Note
Replace the $USER in commands above with the name of the user you wish to be the new Kolibri system service owner.
Raspberry Pi
There are several varieties of operating systems for Raspberry Pi. This guide is intended for and tested on Raspian, the most popular choice of OS, based on Debian. To obtain and install Raspbian, refer to the official documentation.
Kolibri is intended for Raspberry Pi Model 3 and upwards.
Tip
The standard Raspbian OS has a graphical desktop. You can also install Raspbian Lite which uses fewer resources, but only has a command line interface. The instructions in this documentation work seamlessly on both.
Warning
Most of these steps require an internet connection. It is not possible to prepare a blank Raspberry Pi for Kolibri without fetching additional software packages from online sources.
Install
We need to upgrade the
python3-cffilibrary, which is outdated on Raspbian. Upgrade it like this:sudo apt install libffi-dev python3-pip python3-pkg-resources dirmngr sudo pip3 install pip setuptools --upgrade sudo pip3 install cffi --upgrade
Add our Ubuntu PPA with these special instructions:
sudo su -c 'echo "deb http://ppa.launchpad.net/learningequality/kolibri/ubuntu xenial main" > /etc/apt/sources.list.d/learningequality-ubuntu-kolibri-xenial.list'
sudo apt-key adv --keyserver keyserver.ubuntu.com --recv-keys DC5BAA93F9E4AE4F0411F97C74F88ADB3194DD81
sudo apt update
sudo apt install kolibri
When asked questions during the installation, it is recommended that you use the default
piuser for running Kolibri because it will have access to USB devices.When the command finishes, open the default browser at http://127.0.0.1:8080 and proceed with the Initial Setup of your facility.
Note
The following issues are quite common on a Raspberry Pi:
System time isn’t set properly or resets during power-off. This causes errors while downloading software. For instance, SSL certificates for online sources will fail to validate. Ensure that you have the right timezone in
/etc/timezoneand that the clock is set properly by runningsudo ntpd -gq.Storage space is often scarce. If you have a USB source for additional storage, you can use the
kolibri manage movedirectorycommand or create your own symbolic links to have the data folder located elsewhere.Using the built-in management command:
# Stop kolibri
sudo systemctl kolibri stop
# Move the data
kolibri manage movedirectory /path/to/your/external_drive
# Start kolibri
sudo systemctl kolibri start
I/O operations are slow: This means that a typical bottleneck on a Raspberry Pi is file transfer to/from MicroSD card or USB attached storage. Once Kolibri is up and running, this will not be a bottleneck, but while copying initial contents of several gigabytes, you will experience this. Both the SD card reader and the USB ports will limit you at 50-80MB/sec. From our experience, it doesn’t matter much whether you are using the main SD card reader for storage or some media connected to your USB, as in principle they both reach about the same maximum speeds. However, you may find significant differences in the speeds of individual SD Cards.
When replicating installations, you can save time if you connect the SD card of USB storage to another device with faster transfer speeds. Replication will be described in future guides.
Uninstall
From the command line: sudo apt-get remove kolibri.
Upgrade
When you use the PPA installation method, upgrades to newer versions will be automatic, provided there is internet access available.
Other Linux & MacOS
Compatibility
- MacOS: 10.6+, all browsers supported
- Linux: Any system with Python 2.7, all browsers supported
Install
To install Kolibri on Linux distributions other than Debian, as well as on MacOS, you can use generic installation with pip install command, or follow these steps to run Kolibri with the PEX package.
Download the PEX installer for Kolibri version 0.11.
Make sure to open the Terminal where you downloaded the
PEXfile. For example, if you saved it in the Downloads folder, type this when you open the Terminal, and press Enter:cd DownloadsType the following commands next (press Enter after each one).
chmod +x kolibri-installer-filename.pex
./kolibri-installer-filename.pex start
Note
Make sure to substitute the
kolibri-installer-filename.pexwith the exact name of the file you downloaded in both commands. For example, if the name of the downloaded file iskolibri-v0.11.0.pex, type that instead ofkolibri-installer-filename.pex.When the command finishes, open the default browser at http://127.0.0.1:8080 and proceed with the Initial Setup of your facility.
Warning
Remember that PEX package allows you to run Kolibri on your system only while the process is active in the Terminal window. If that process is stopped (by either pressing Ctrl + C, closing the Terminal, or restarting your system), you will need to repeat the above steps to start Kolibri again. User accounts, classes and groups you create, as well as the content channels you download, will be available every time you restart Kolibri.
Uninstall
- Delete the
PEXfile. - Delete the
./kolibrifolder in your user’s Home directory if you want to completely remove all the Kolibri files and content channels you imported.
Upgrade
To upgrade Kolibri, follow these steps.
- Download the new version of Kolibri PEX installer.
- Start Kolibri as during the first install.
- Go explore the new and improved Kolibri features!
Python pip package
You can install Kolibri as a standard package from PyPi (works on Mac, Windows, and Linux) using this command:
pip install kolibri
Initial Setup
To do the initial setup of your Kolibri facility after the installation, follow these steps.
Note
You need to do the initial setup only once, the first time you start Kolibri after the installation. You can change all the settings later, except the type and the name of the facility.
Select the default language for Kolibri.
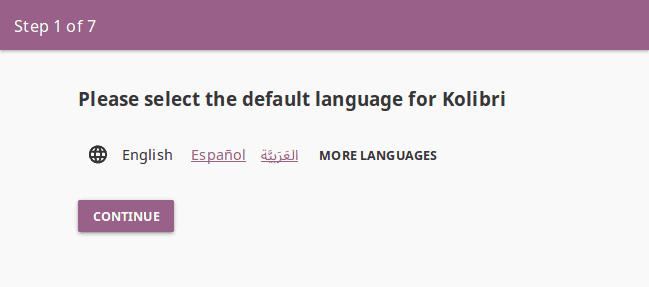
Select the default Kolibri language.
Warning
The default language configured for content in your browser preferences might override the language you choose in this step. To ensure that Kolibri displays in the desired language, make sure to configure it as default in the browsers of all the devices that will be used to view Kolibri content.
Facility name and type. A “Facility” is the location where you are installing Kolibri, such as a school, training center, or even your home.
Non-formal type can be used in libraries, orphanages, correctional facilities, youth centers, computer labs and similar, Formal one in schools and other formal learning contexts, and Personal should work best for parent-child or supplementary individual learning.
Formal and non-formal facilities require a name, while personal ones do not.
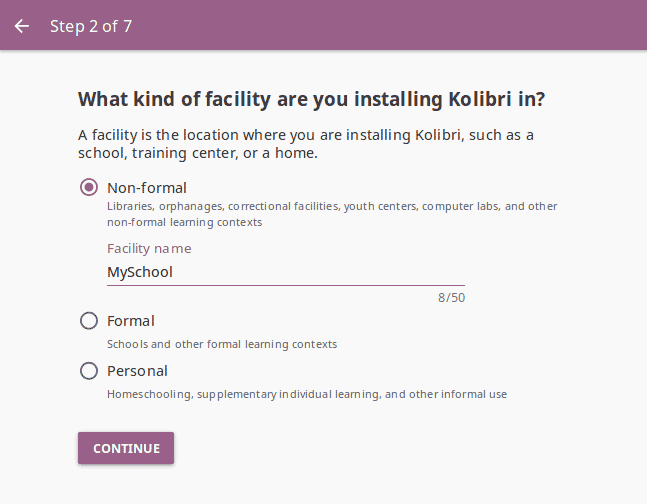
Choose the type of facility.
Guest access.
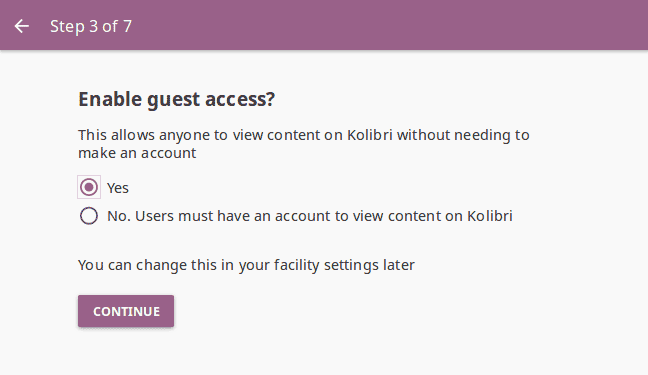
Select if guests can access Kolibri content without the need to create an account.
User account creation.
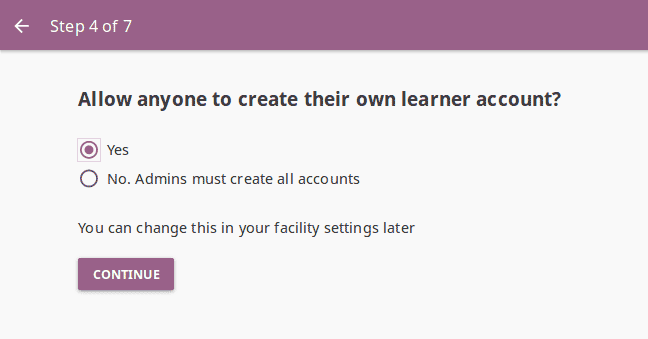
Select if anyone can create a user account for themselves, or if user accounts must be created by Kolibri admins.
Enable passwords for learners. Simplified sign-in, without the password requirement, allows easier access for younger learners.
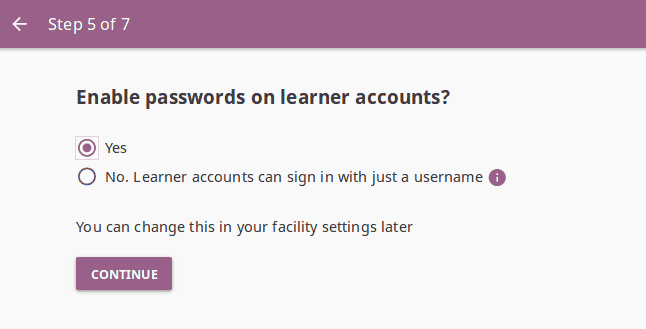
Select if learners must type in their passwords to sign-in to Kolibri.
Create super admin account. This admin user will be a super admin, able to manage all the device content, and all the rest of the facility users and their permissions.
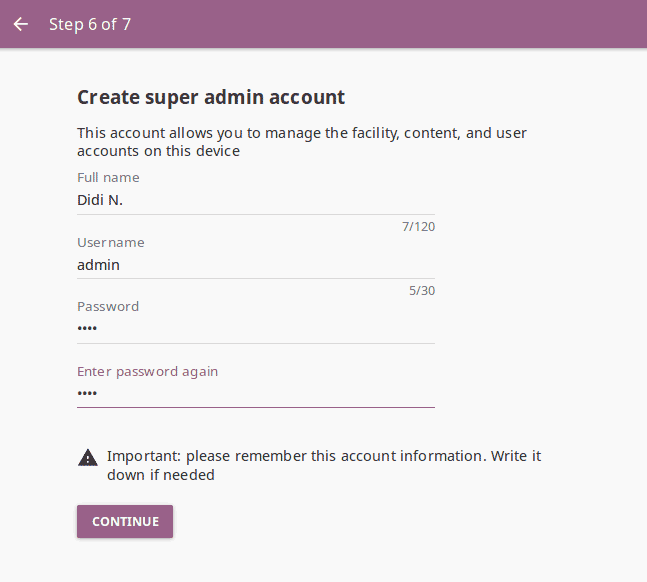
Select the username and password for the facility super admin.
Tip
Make sure to save these super admin credentials in a safe place!
Data usage and privacy - responsibilities of the adminstrator. When you are setting up a Kolibri facility, especially in formal contexts, you need to take into consideration the relevant privacy laws and regulations. You as the super admin, or someone you delegate, will be responsible for protecting and managing the user accounts and personal information stored on the device. Review the data usage and privacy statement before finihsing the facility setup.
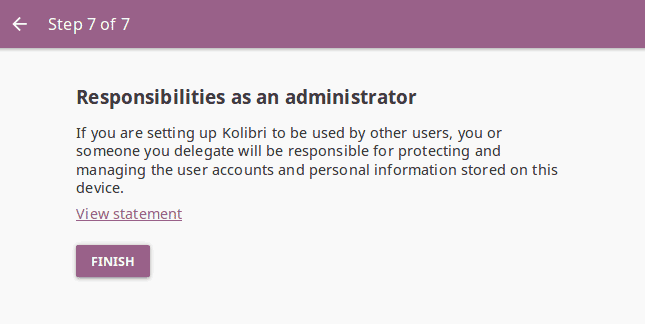
Review the super admin responsibilities regarding the data usage and privacy.
Once you finish the initial setup, proceed to import some content, and create users (if you chose the Admin-managed facility setup). Make sure to check how to configure other computers in the network to access Kolibri.