Manage Kolibri
Default User Roles
Kolibri users by default can be divided in 3 different roles with respective access to features.
| Default user roles |
|---|
|
|
|
Kolibri Super Admins
Kolibri super admin users have all device permissions, and are able to assign them to other users. Therefore super admin users can:
|
Tip
If you are unable to retrieve the username and password for a super admin account in your facility, you can create a new super admin account using the command line.
Assign Additional Permissions
By default, only super admin users can view the Device dashboard, import/export Content channels in Kolibri, and modify Permissions for other users. However, depending on the needs of the institution, super admin users can also grant these permissions to other users.
Manage Device
You can manage content and permissions, and view the detailed info of the device where Kolibri is running from the Device dashboard.
Note
To manage device settings you must have the appropriate permissions.
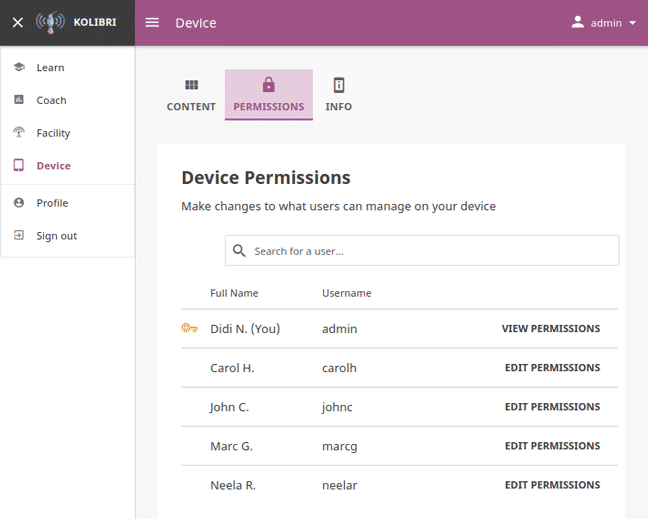
Assign Permissions
You can assign additional permissions to Kolibri users which will provide them access to more features compared to their user roles. To manage permissions for Kolibri users, use the Permission tab in the Device dashboard (Permissions icon).
Permission to Manage Content
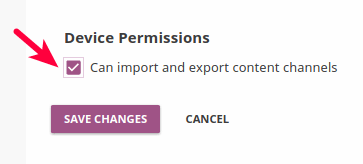
To grant permission to another user to manage content channels in Kolibri, that is to import, export and delete them from the device, follow these steps.
Click EDIT PERMISSIONS for the chosen user.
Under Device permissions activate the option Can import and export content channels.
Click SAVE CHANGES to apply and finish.
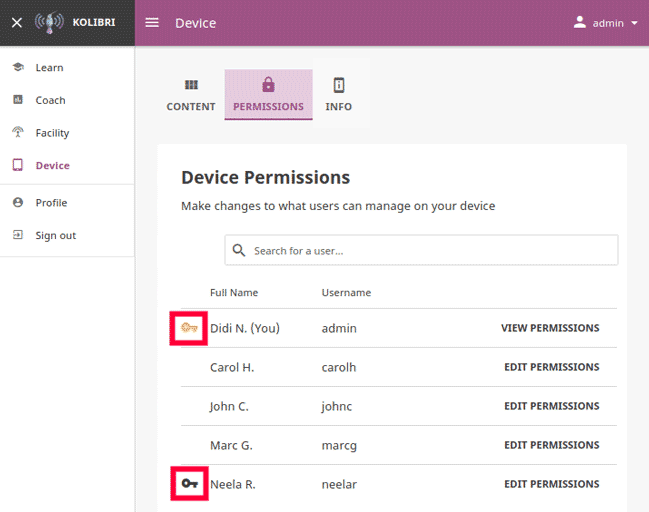
The users who have been granted the permissions to manage content channels will have a black key indicator in front of their name, and will be able to see the Device dashboard with the Channels tab.
Super Admin Permissions
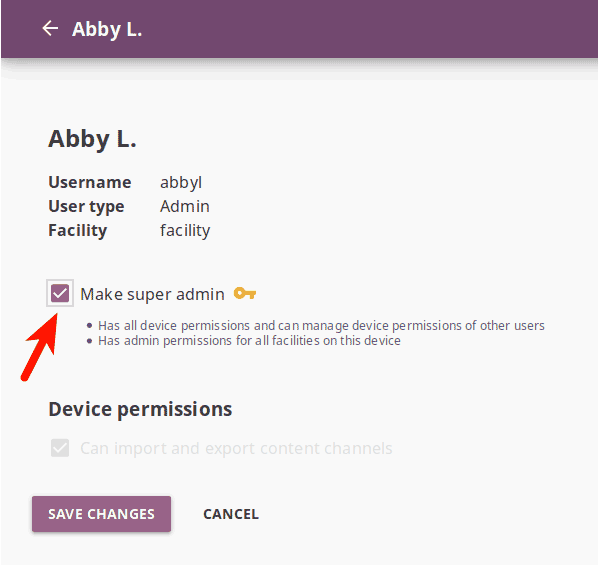
To grant super admin permissions to another user, follow these steps.
Click EDIT PERMISSIONS for the chosen user.
Activate the option Make super admin.
Click SAVE CHANGES to apply and finish.
The users who have been granted the super admin permissions will have a yellow key indicator in front of their name, and will be able to see the Device dashboard with both the Content and Permissions tabs.
View Device Info
To view the detailed info of the device where Kolibri is running on, use the Info tab in the Device dashboard (Info icon). This information will be useful in case you need to report an issue with Kolibri on the Learning Equality Community Forums.
Click the Show link to open the Advanced device info.
Make note or copy the following device details to clipboard.
Kolibri version
Server IP/URL(s)
Database path
Device name
Operating system
Free disk space
Server time
Server timezone
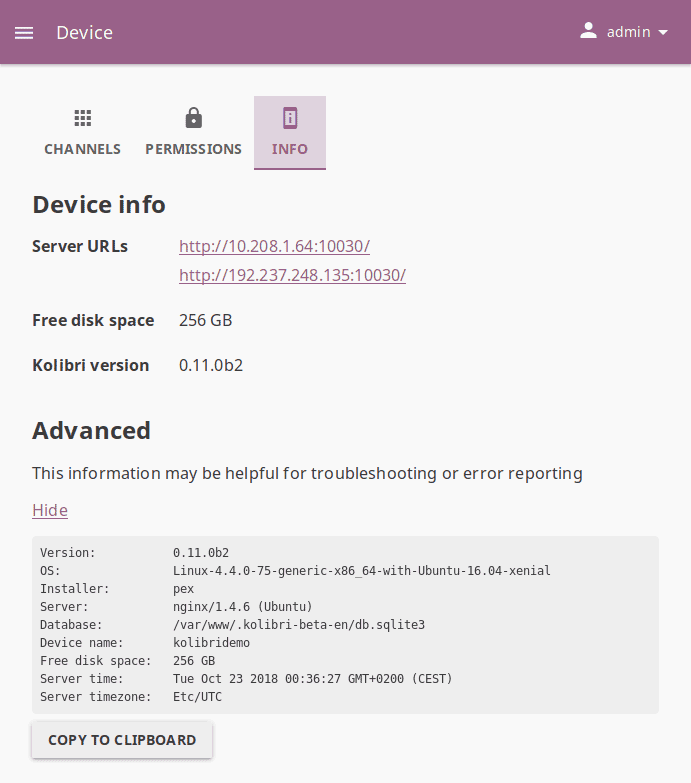
Find out the extended device info in the Device > Info tab.
Manage Content
Note
To manage Kolibri content channels you must have the appropriate permissions.
Kolibri Content Channel is a collection of educational resources (video, audio, document files or interactive apps) prepared and organized by the content curator for their use in Kolibri. You can import and export content channels in Kolibri from the Channels tab of the Device dashboard (Channels icon).
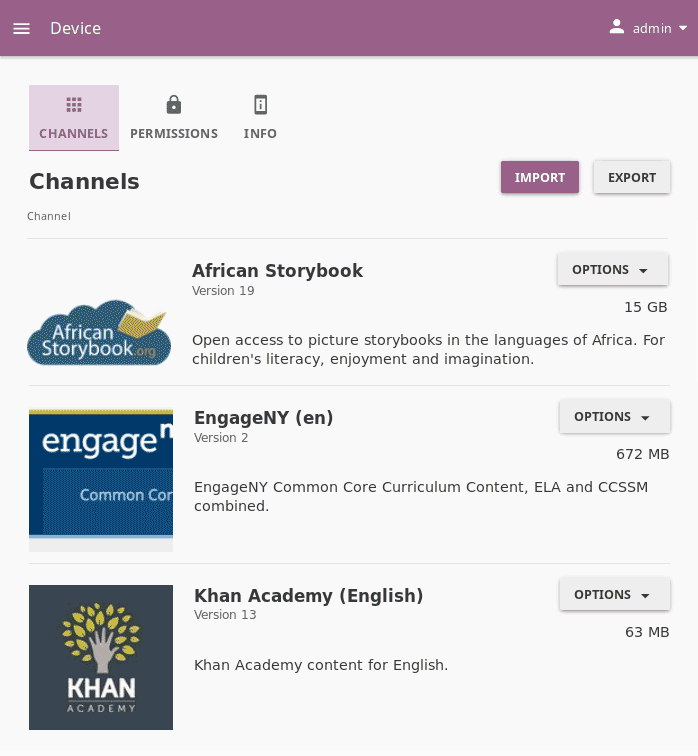
Kolibri content channels in the Device > Channels tab.
Each Kolibri content channel has its own token/ID in Kolibri Studio. You can freely view and browse content to import from the public channels in Kolibri, but in order to import content from private or unlisted channels, you will need the channel token or ID from the content curator who assembled it.
Note
The term Channel ID was valid for Kolibri versions up to 0.6, while from the Kolibri version 0.7 onward, we started using exclusively the term token to uniquely designate each channel.
Warning
When you use the Terminal or command prompt to import content channels in Kolibri from the command line, you still must use the 32 digit channel ID, as the command will not work with the token. Make sure to receive the correct channel ID from the person who curated the channel you need to import, or refer to Kolibri Studio user guide how to find it in Studio user interface, if you have channel editor access.
Import Content into Kolibri
Warning
Important: You cannot import your own files (videos, documents, etc.) as learning resources directly into Kolibri from your computer. Kolibri can only import content from:
- already curated content channels on Kolibri Studio, if the computer running Kolibri is connected to internet
OR
- an external storage drive (USB or hard drive) where content channels have been previously exported to from another Kolibri installation, if the computer running Kolibri is not connected to internet
To import your own files for use in Kolibri, you need to register at Kolibri Studio site (it’s free), and build your own content channel that you can subsequently import into Kolibri. Read more about how to do this in our Kolibri Studio user guide.
Warning
Kolibri database and content may become temporarily unavailable while importing or updating large content channels. Therefore, as a precaution, we recommend you:
- avoid other interactions with Kolibri (view learner pages or manage users, for example) while content import is in progress
- perform these maintenance operations outside the periods when system is being used by learners
To import content into Kolibri, follow these steps.
- Click IMPORT in the Channels tab on the Device page.
- Choose the source option: Kolibri Studio, Local network or internet, or Attached drive or memory card.
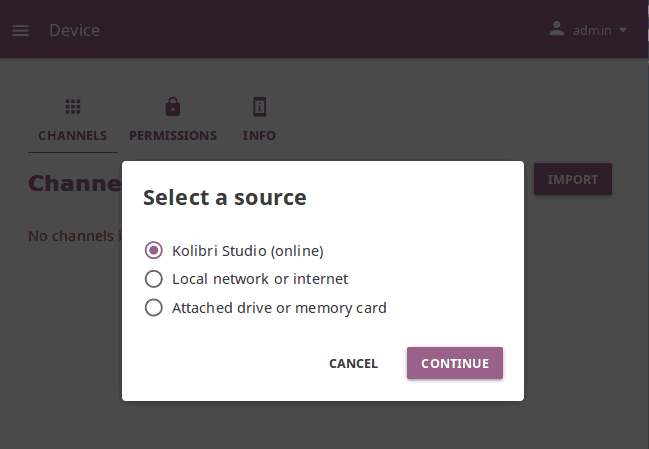
Select a source to import Kolibri content channels.
Import Content from Kolibri Studio
If the computer where Kolibri is running has an Internet connection with the sufficient bandwidth, follow these steps to import content channels.
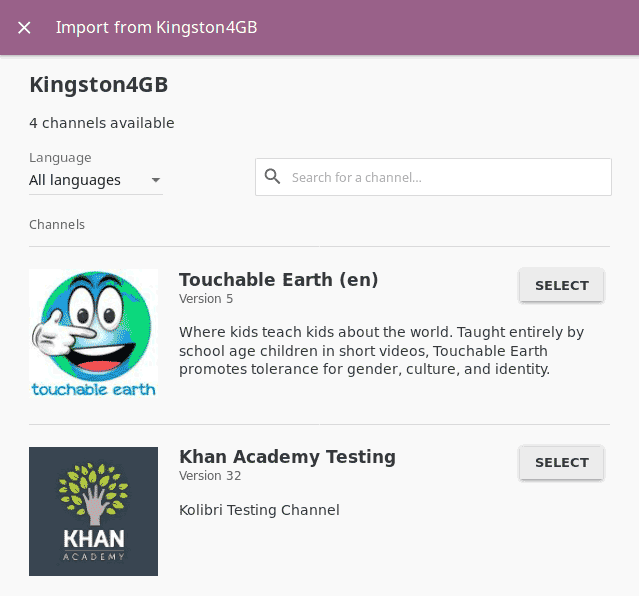
Choose option Kolibri Studio, click CONTINUE and you will be able to see all the available public content channels.
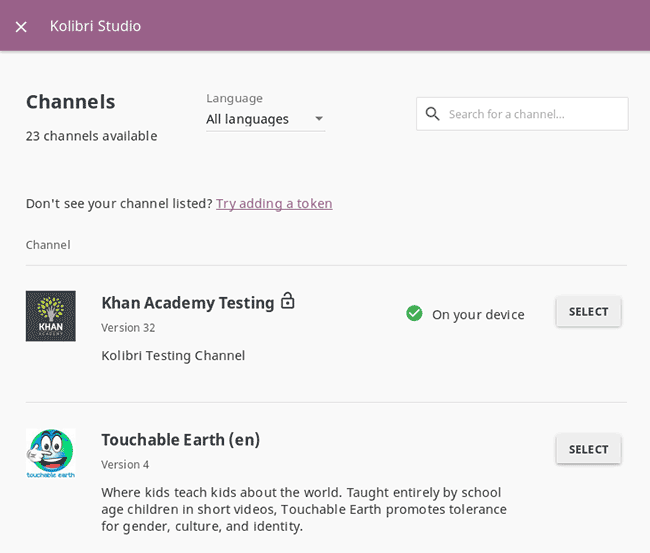
Select which public channel on Kolibri Studio you want to import content from.
Channels from which you have already imported some or all content onto your device will have the
 icon.
icon.
Click SELECT for the desired channel, and wait for Kolibri to load the channel information and the topic tree.
Warning
This could take some time for big channels. Please be patient, as Kolibri needs to retrieve a lot of information to display.
In the Select content from… page you will see all the details for the selected channel: description, version, total size and number of learning resources, with the information weather you have some of the resources from that channel already imported on the local device.
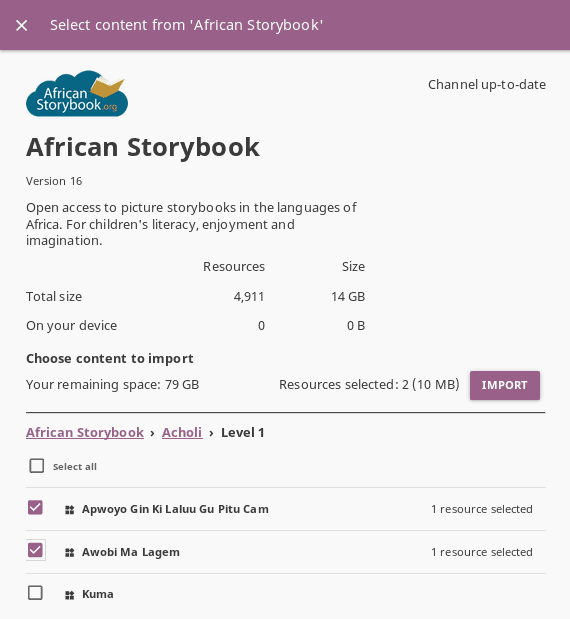
Under Choose content to import click the topics links to browse through the channel contents. Use the Select all checkbox to import the content channel in full, or select only certain topics or resources. As you keep selecting, you will see the total number and size on disk under Content selected:, and the remaining space on your device.
Click IMPORT once you finish selecting all the desired content.
Wait for the content to be downloaded and click CLOSE for the new channel to appear under the Channel heading.

If you need to import content from a private/unlisted channel, click on Try adding the token link above the channel list.
Enter the channel token/ID received from the channel curator on Kolibri Studio.

Click CONFIRM to unlock channel, or CANCEL to exit.
Proceed to select and import channel topics and resources as for the public channels.
Unlisted or private channels in the list are indicated with the Unlisted channel icon.
- To add more learning resources from a channel that you previously imported content from, click OPTIONS, select Import more, and repeat the selection procedure from step 3.
Import Content from a Local Network or Internet
You can also import content from a different device running Kolibri in your same local network, or even from a Kolibri server hosted outside your LAN, provided you know its exact IP address. This feature is useful for when you have:
- a larger country- or region level Kolibri content server outside your LAN, but with resources specific to your implementation requirements
- various instances of Kolibri servers in your local network, in order to support a high number of client (learner) devices
Follow these steps to import content channels.
- Choose option Local network or internet, and click CONTINUE.
- Click New address link to add a new network address.
- Input the full network address, and assign a name for this network. Don’t forget to add the correct port if different from the default one
8080. You can use either the IP address or the domain name.
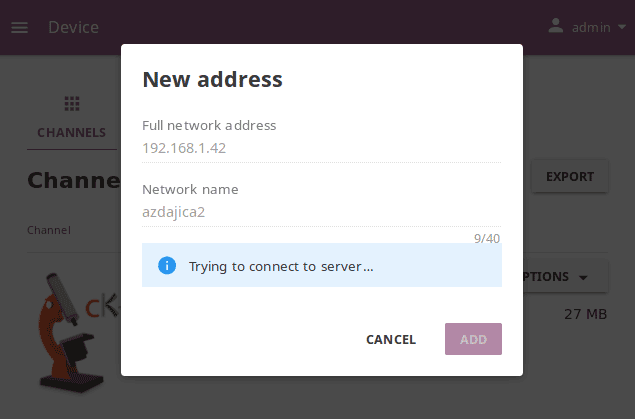
- Click ADD to save this address to your device settings. If you later decide to delete it, use the link Forget.
- Click CONTUNUE and follow the same steps for selecting topics and resources as for the import from Kolibri Studio.
Warning
This feature was introduced in Kolibri version 0.11, and all the server devices to be used for this type of content import must have the Kolibri version 0.11 or later running.
Import Content from a Local Drive
If the computer where Kolibri server is running does not have access to Internet or has insufficient bandwidth, you have the option to receive content channels stored on an external drive (USB stick or hard disk). Follow these steps to import content channels.
- Connect the external USB drive to your computer.
- Choose option for Attached drive or memory card, and click CONTINUE.
- Kolibri will automatically detect and display the drive(s) with available Kolibri content files.
- Select the drive where the desired channel is stored, and click CONTINUE.
- Click SELECT for the desired channel, and follow the same steps for selecting topics and resources as for the import from Kolibri Studio.
Tip
Workaround for import from external drive on older devices.
If Kolibri is installed on an older or a low-resource device, you can try the following procedure for importing content channels for faster results.
- Stop Kolibri.
- Browse the local drive with the file explorer of your operating system.
- Copy the
contentfolder located inside theKOLIBRI_DATAfolder on the local drive. - Paste the copied
contentfolder inside the.kolibrifolder on your hard disk. The location of the.kolibrifolder will depend on your operating system (see the table below). - Confirm the merge of the two folders.
- Restart Kolibri, and the new channels should now be available.
Operating system Location Windows C:/Users/<your_username>/.kolibri/OSX HD/Users/<your_username>/.kolibri/Linux /home/<your_username>/.kolibri/On Linux and OSX you will need to enable the Show hidden folders option in order to view the
.kolibrifolder.
Export from Kolibri to Local Drive
If you have imported content on one Kolibri device, and want to make it available on another computer where Kolibri is installed, follow these steps to export your content channels.
Note
You must have an external drive (SD card, USB stick or hard disk) attached to your device.
Click EXPORT in the Channels tab on the Device page.
Select the local drive (destination for the export) where you wish to export Kolibri content, and click CONTINUE.
In the Export to <name-of-your-drive> page you will be able to see all the available content channels on your device.
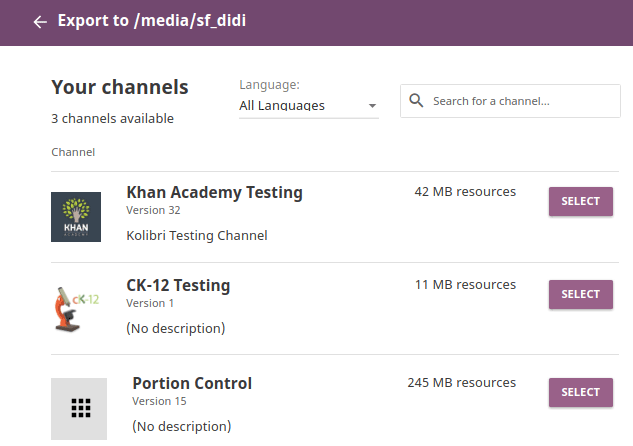
Click SELECT for the desired channel, and wait for Kolibri to display the channel information and the topic tree.
In the Select content from… page you will see all the details of the selected channel: description, version, total size and number of learning resources.
Under Choose content to export you can browse the channel topics and individual resources. Use the Select all checkbox to import the content channel in full, or select only certain topics or resources. As you keep selecting, you will see the total number and size on disk under Resources selected:, and the remaining space on the destination drive.
Click EXPORT once you finish selecting all the desired content.
Wait for Kolibri to export the selected content and click CLOSE.
Once the export is finished, safely disconnect the drive according to the recommended procedure for your operating system, and proceed to import channels on other devices.
Note
This procedure makes a copy of the
contentfolder located inside the.kolibrifolder on your hard disk, and places it in theKOLIBRI_DATAfolder on the selected local drive. This structure is recognized by the Import from local drive command.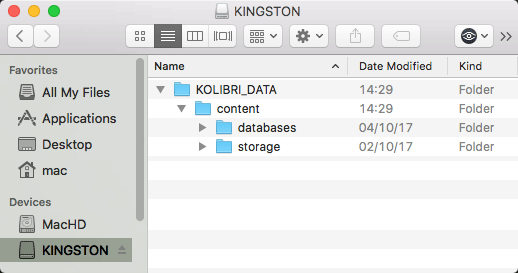
Delete Channel
To delete a content channel from your device, follow these steps.
Click OPTIONS for the channel you want to delete.
Select Delete option.
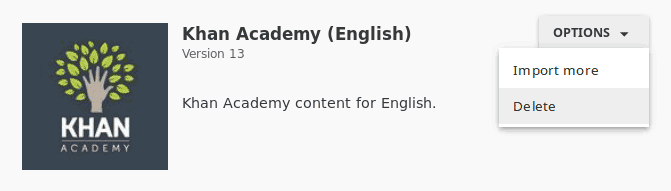
Click DELETE to proceed, or CANCEL to exit without deleting the channel.
Manage Facility
You can edit facility configuration settings in Kolibri from the Settings tab in your Facility dashboard (Settings icon).
Activate the options you want to make available for the users of your facility. You have the possibility to allow users to:
- edit their full names and usernames
- sign in without password (except Admin users)
- download content items (videos, documents, etc.) on their own devices
- browse content without signing in
- create accounts on your facility
Click SAVE CHANGES to apply and finish.
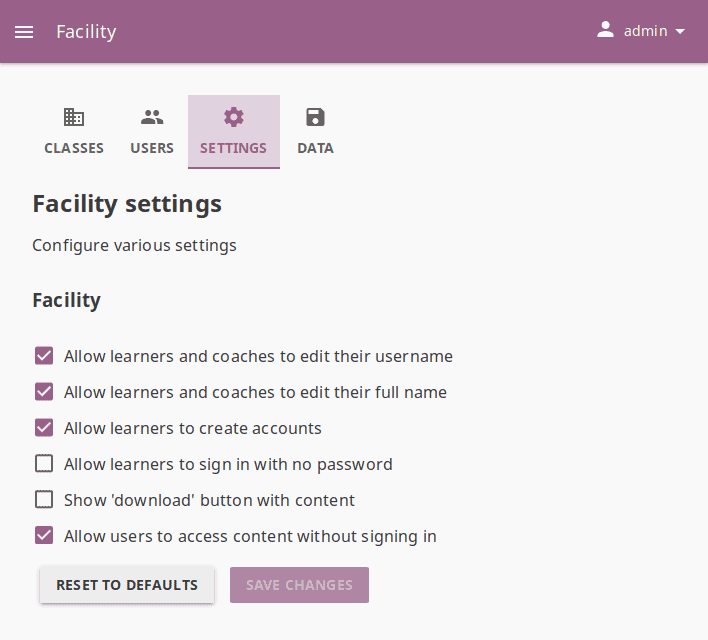
Manage facility configuration settings.
Note
To manage facility settings in Kolibri you must sign in as admin or super admin.
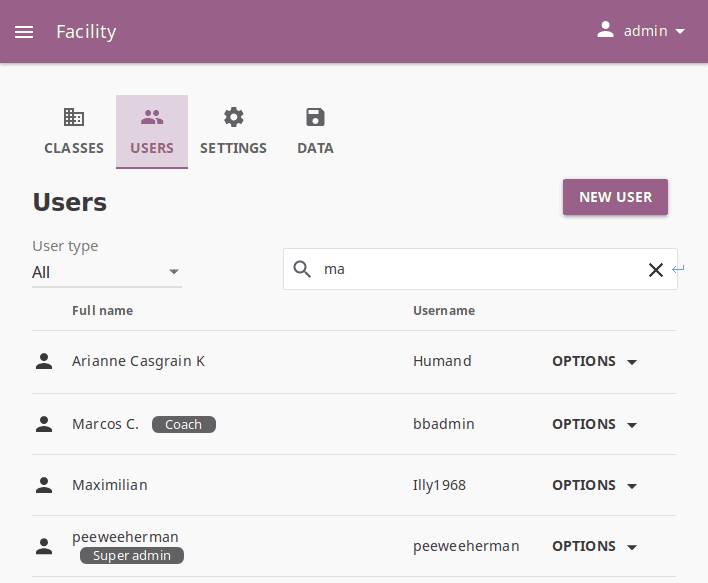
Manage Users
You can search for, filter, add, and edit user accounts in Kolibri from the Users tab in your Facility dashboard (Users icon).
Note
To manage Kolibri users you must sign in as admin or super admin.
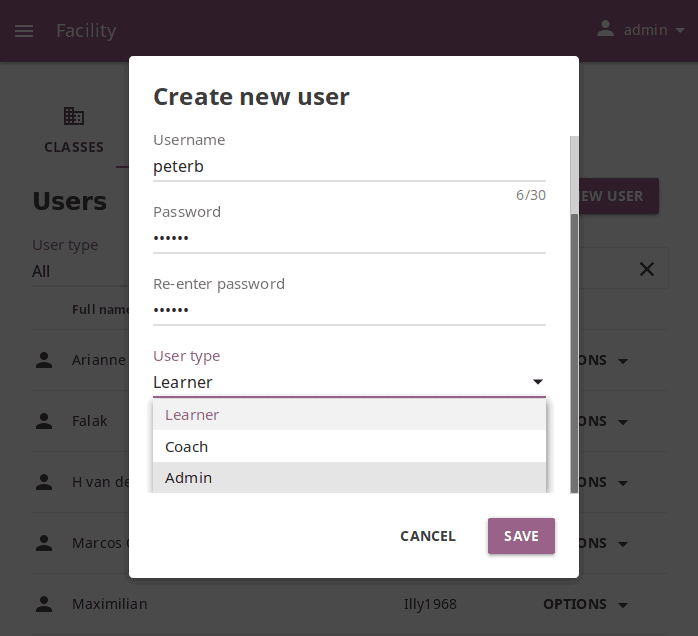
Create a New User Account
To create a new user account, follow these steps.
Click NEW USER button.
Fill in the required information (name, username, password).
Select the user type (Admin, Coach or Learner).
Click SAVE to add the new user.
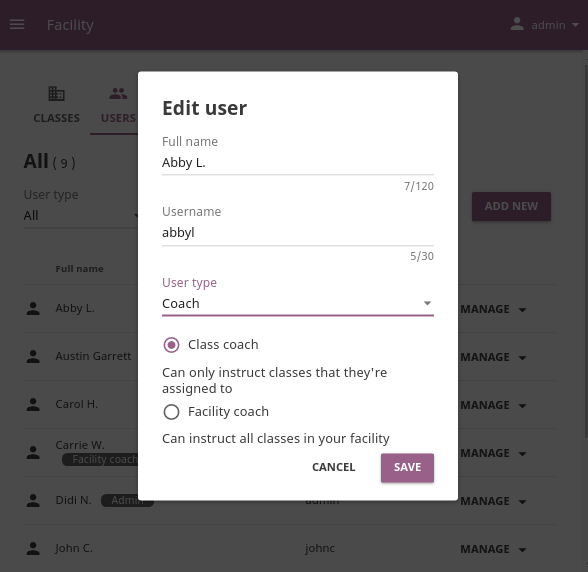
Coach Type
When you create a new Coach user account, or change the type (role) to Coach for an existing user, you can choose between:
Class coach, that will have access to the coach dashboard and permissions to instruct ONLY the learners in the classes they are assigned to.
Facility coach, that will have access to the coach dashboard and permissions to instruct ALL the classes and the learners in the facility.
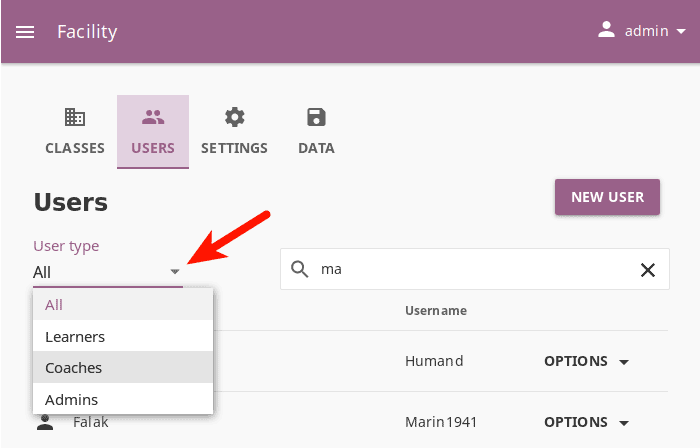
Select Users by Type
Click to open the selector under User type to see filtering options. All users are displayed by default.
Toggle between options (learners, coaches, admins) to display the users according to type.
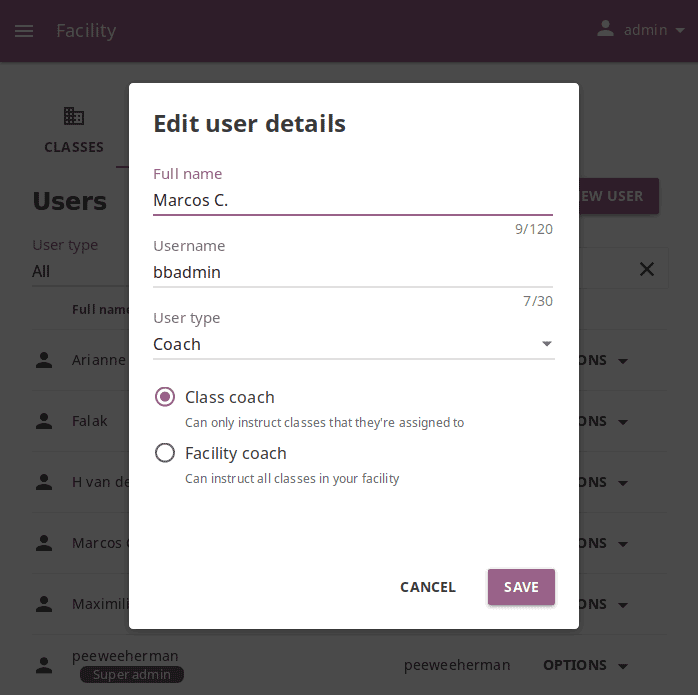
Edit User’s Account
To edit username, full name or account type, follow these steps.
Click on the OPTIONS button for the desired user and select the Edit details option.
Edit Full name, Username or User type in the Edit user details window.
Click SAVE to update the edited information, or CANCEL to exit without saving.
Reset User’s Password
Click on the OPTIONS for the desired user and select the Reset password option.
Enter the new password in both fields in the Reset user password window.
Click SAVE to confirm, or CANCEL to exit without changing the password.

Delete User’s Account
Click on the OPTIONS for the desired user and select the Delete option.
Click DELETE to confirm, or CANCEL to exit without deleting the account.
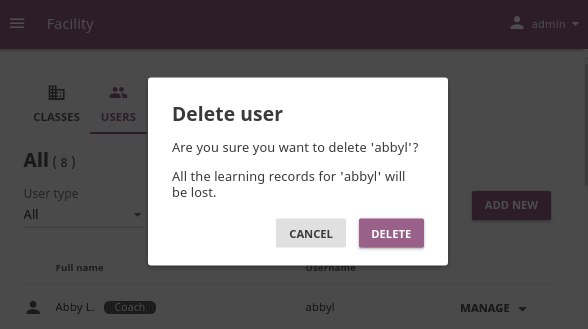
Warning
When you delete a user, all their learning records will be erased from the database.
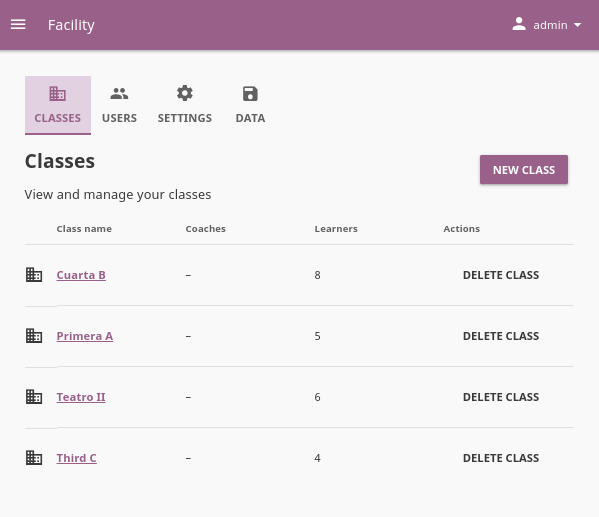
Manage Classes
You can view, create and delete classes, as well as search, filter and enroll Kolibri users in them, using the Classes tab in your Facility dashboard (Classes icon). Default view displays the list of all classes in your facility, with the number of enrolled users for each class.
Note
To manage Kolibri classes you must sign in as admin or super admin.
Add New Class
To add a new class, follow these steps.
- Click NEW CLASS.
- Fill in the class name.
- Click SAVE to add the new class, or CANCEL to exit.
Delete Class
To delete class, follow these steps.
- Click DELETE CLASS for the chosen class from the list.
- Click DELETE in the confirmation window to proceed, or CANCEL to exit without deleting the class.
Note
Users enrolled in the class you are deleting will not be removed from the database.
Edit Class, Learners and Coaches
A newly created class does not have any learners or coaches. To edit a class select it from the default view in the Classes tab. In this view, you can change class name, add or remove currently enrolled learners and assign or remove coaches from the class.
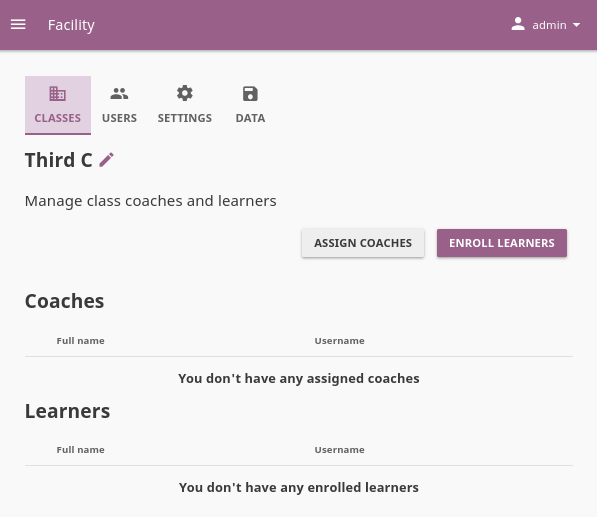
Enroll Learners in Class
Click the ENROLL LEARNERS button on the class details page.
- List in this view contains all the learners currently NOT enrolled for the selected class.
- You can search for a specific learner by name.
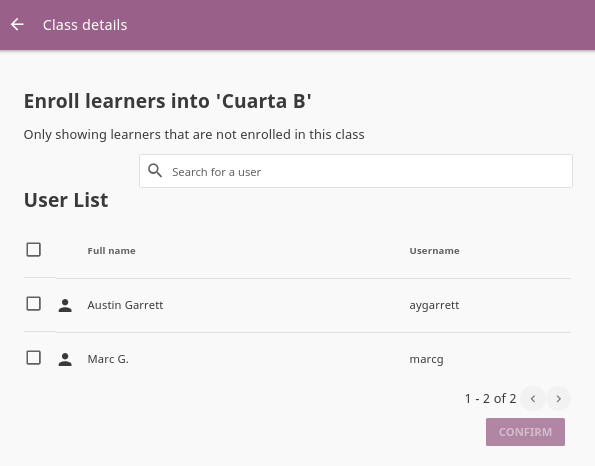
Use checkboxes to select all the learners in the list, or the search field for specific learners you want to enroll to class.
Click CONFIRM to finish enrolling the selected learners and return to the main class page.
Remove Learners from Class
Click REMOVE for the chosen learner.
Click REMOVE to confirm, or CANCEL to exit without removing the learner.
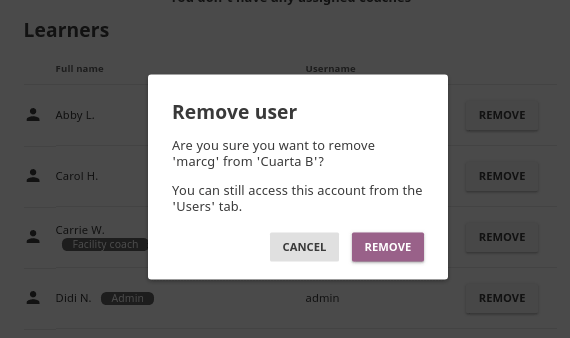
Note
Learners removed from the class will not be deleted from the database, and you can still access their accounts from the Users tab in the Facility dashboard.
Assign Coaches to Class
- Click the ASSIGN COACHES on the class details page.
- List in this view contains all the users with Coach, Facility coach or Admin roles.
- You can search for a specific user by name.
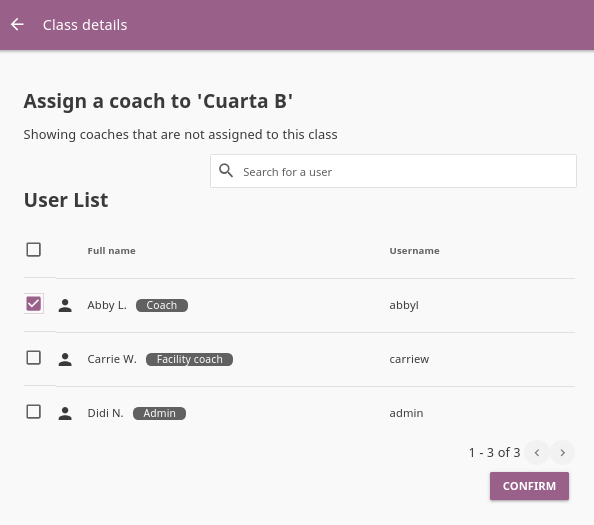
- Use checkboxes to select all the users in the list, or the search field for specific users you want to assign as a coach to class.
- Click CONFIRM to finish.
Remove Coaches from a Class
- Click REMOVE for the chosen coach.
- Click REMOVE to confirm, or CANCEL to exit without removing the coach.
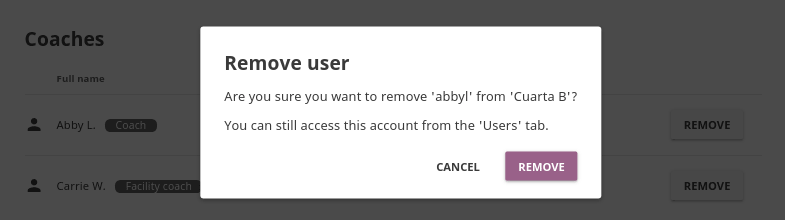
Note
Coaches removed from the class will not be deleted from the database, and you can still access their accounts from the Users tab in the Facility dashboard.
Rename Class
To edit class name, follow these steps.
- Click on the edit button (Edit icon) next to the class’ name.
- Write the new name in the Class name field.
- Click SAVE to confirm the edited information, or CANCEL to exit without saving.
Manage Data
You can download Kolibri Detail and Summary logs usage data and export in the CSV format from the Data tab in your Facility dashboard (Data icon).
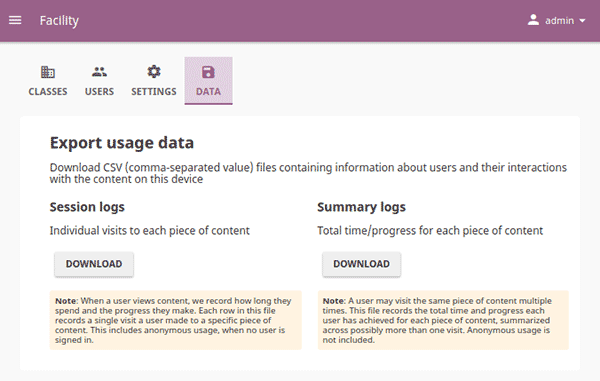
Note
To manage Kolibri users you must sign in as admin or super admin.
Advanced Manage Options
Working with Kolibri from the Command Line
Warning
- In Windows you need to open
cmd.exeCommand prompt in the folder where Kolibri executable is located:c:/Python34/Scripts. - On macOS you may need to prefix the commands with
python, for examplepython kolibri start. - If you are running Kolibri with the
PEXfile, make sure to substitute thekolibriin below commands with the exact name of the file you downloaded preceded by./. For example, to start Kolibri from the downloaded filekolibri-v0.11.pex, type./kolibri-v0.11.pex start. - Make sure not to include the angle brackets “< >” in the commands below.*
If you see errors in the prompt/terminal output while running the commands below, ask for help at our Community Forums, or file an issue on GitHub.
Start/Stop Kolibri
In case you need to troubleshoot potential problems while running Kolibri, you may try to start it manually from the command line.
kolibri start --debug --foreground
kolibri stop
Run Kolibri from a Different Port
Import Content Channels from Internet
To import content channels from Internet, run these two commands in sequence. The first downloads the channel database, and the second downloads the resources (videos, documents, etc.).
kolibri manage importchannel -- network <Channel ID>
kolibri manage importcontent -- network <Channel ID>
Warning
When you import content channels from the command line, you still must use the 32 digit channel ID, as the command will not work with the token. Make sure to receive the correct channel ID from the person who curated the unlisted channel you need to import, or refer to Kolibri Studio user guide how to find it in Studio user interface, if you have channel editor access.
Export Content Channels
To export Kolibri content channels on a local drive in order to share it with another device, run these two commands in sequence. The first exports the channel database, and the second exports the resources (videos, documents, etc.).
kolibri manage exportchannel -- <Channel ID> /path/to/local/drive/KOLIBRI_DATA
kolibri manage exportcontent -- <Channel ID> /mount/mydrive/KOLIBRI_DATA
The path should be to a folder named KOLIBRI_DATA at the root of the local drive, so it will get picked up later for importing via the Web UI.
Create a New Super Admin
In case you need to create another super admin user, either to address additional need of managing facility, or if you lost the password for the old one, run the following command.
kolibri manage createsuperuser
You will be prompted to input the Username and Password and the new super admin user account will be created.
Change Language
kolibri language setdefault <langcode>
| Language | <langcode> |
|---|---|
| English | en |
| Spanish (Spain) | es-es |
| Spanish (Mexico) | es-mx |
| French | fr |
| Swahili (Tanzania) | sw-tz |
| Arabic | ar |
| Bulgarian | bg |
| Farsi | fa |
| Hindi (India) | hi-in |
| Urdu (Pakistan) | ur-pk |
| Marathi | mr |
| Chinyanja | nyn |
| Portuguese (Brasil) | pt-br |
| Telugu | te |
| Vietnamese | vi |
| Yoruba | yo |
Backup and Restore Kolibri Database
Kolibri automatically creates a backup of the database with every version upgrade. If for some reason you need to make a manual backup, use the following command.
kolibri manage dbbackup
This command will create a time-stamped .dump file in the ./kolibri/backups folder that you can use to restore the database with the following command.
kolibri manage dbrestore --latest
If you need to restore a backup version prior to the latest one, you must specify the full path to a specific *.dump file.
kolibri manage dbrestore ~/.kolibri/backups/db-xxxx.dump
Warning
This command is not intended for replication across different devices, but only for restoring on a single device from a local backup of the database.
Change the Location of Kolibri Content Files
Kolibri content channels may occupy a considerable amount of hard disk space over time. If you have concerns about running out of storage on your device, you can move the Kolibri content files to another drive.
Tip
If you have both SSD disk and HDD disk available on your device, it is recommended to install Kolibri on the SSD drive to allow faster access to the database, and move just the content file to the HDD drive.
To move the Kolibri content folders to another location, follow these steps.
- Stop Kolibri.
kolibri stop
- Create a new folder that will contain all the content files and resources on the destination drive.
kolibri manage content movedirectory <destination>For example, if you created a new folder
KolibriContenton an external drive, run this command.kolibri manage content movedirectory /mnt/my_external_drive/KolibriContentIf you are on Windows, and the new folder
KolibriContentis on the driveF:, run this command.kolibri manage content movedirectory F:\KolibriContent
- Restart Kolibri.
This command will move the 2 subfolders databases and storage, from their default location inside the .kolibri/content folder in your device’s home directory, to a new location you specified in the command.
Change the Location of ALL Kolibri Files
If you want to change the directory where all of Kolibri’s runtime files are located, together with the imported content channels, you need to change the environment variable called KOLIBRI_HOME to the path of your choice.
If the variable is left unset, by default, Kolibri’s runtime files and content will be placed in your user’s home folder, under the .kolibri subfolder.
Note
Adjusting this environment variable behaves differently than the movedirectory command above:
- Adjusting the environment variable will not automatically migrate over data. You need to copy the
.kolibrifolder manually to the new location. - If you do copy the
.kolibrifolder, the content will not be affected if it had been previously set using themovedirectorycommand.
There are many ways to set an environment variable either temporarily or permanently. To start Kolibri on OSX or Linux with a different home, follow these steps.
- Stop the server.
- Move the
.kolibrifolder to the new location. - Run the following in Terminal:
KOLIBRI_HOME=/path/to/new/home kolibri start
When you start the server again, all your files should be seamlessly detected at that location.
To change the environment variable KOLIBRI_HOME on Windows, follow these steps.
- Stop the server.
- Move the
.kolibrifolder to the new location. - Run the following in Command Prompt:
setx KOLIBRI_HOME "/path/to/new/home"
Restart the server, and your files should be seamlessly detected at the new location.
Alternatively, you can follow these steps in the GUI.
Go to Computer > Advanced System Settings and press the Environment Variables button.
Under User Variables for… press the New… button.
Input
KOLIBRI_HOMEin the Variable name field, and your new path in the Variable value field, and press OK on both open windows.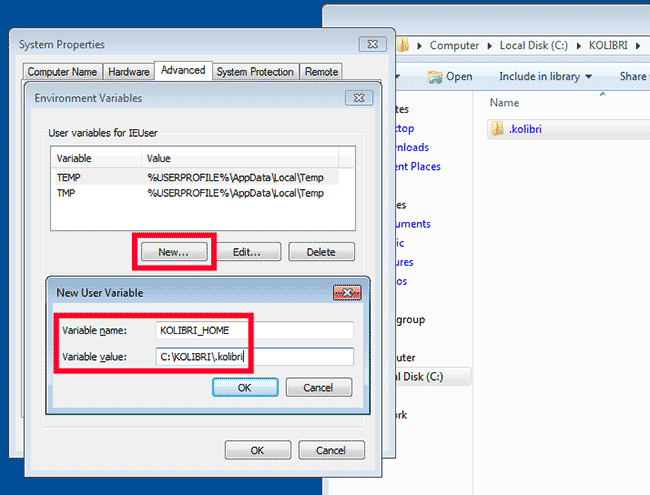
Restart Kolibri.
Customize Kolibri Settings with the OPTION.INI File
For some advanced configuration settings you need to use the option.ini file. Installing Kolibri does not generate this file by default, but you can easily add one yourself. Follow these steps.
Open the preferred text editor on your computer (eg. Notepad on Windows).
Write the required sections and keys (see details for available settings below) in the following format:
[section]
key1 = a
key2 = b
- Save the resulting
option.inifile in the.kolibrifolder inside the Home folder.
Note
option.ini file can contain several sections with one or more associated keys, depending on the requirements of your installation.
Run Kolibri from a Different Port
If you need Kolibri to start and run from a port different than the default 8080, add the section [Deployment], and the key HTTP_PORT with the value of your desired port, to the option.ini file.
[Deployment]
HTTP_PORT = 1234
# Substitute 1234 with your desired port number
Allow Profiling of Requests
If you need to profile server requests to get a more detailed information about the Kolibri performance, add the following to the option.ini file.
[Server]
PROFILE = 1
Test Kolibri Server Performance
Benchmark
You can use the following command to collect information about the device where Kolibri server is running, and details about how much of its resources it is using. This command displays a snapshot of the server state at the time the command is executed, and its output will vary depending on the current server load. In case you suspect performance problems, type this in the Terminal or Command prompt.
kolibri manage benchmark
The command will have an output similar to this:
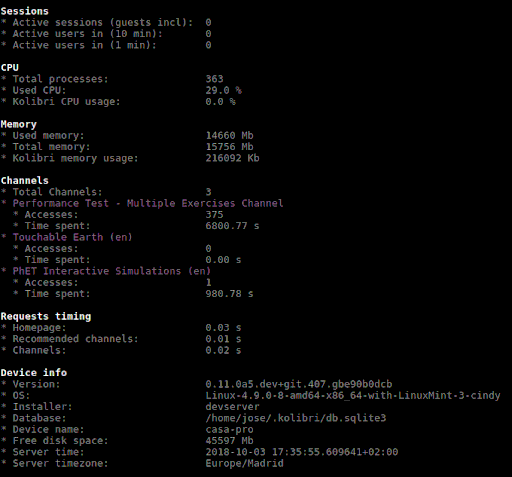
Command line output of the ‘kolibri manage benchmark’ command
Take a screenshot of the Terminal or Command prompt, or copy and paste the output in the community forum post.
Profile
In order to collect more than a current snapshot of Kolibri server performance, you can use the profiling command. When executed, the command will collect a series of performance indicators every 10 seconds and save them in a CSV file. Type this in the Terminal or Command prompt.
kolibri manage profile
Tip
Command collects and saves the information 60 times by default. If you want to change this value, add the --num_samples flag with the desired number at the end.
kolibri manage profile --num_samples=100
Each log line contains this information:
- Date and time of each command execution
- Number of Kolibri active sessions (including guest sessions)
- Number of Kolibri logged users
- Number of Kolibri user interactions during the last minute
- Total percentage of CPU use
- Total memory use
- Total available memory
- Number of processes executed in the server
- Percentage of CPU used by Kolibri
- Percentage of memory used by Kolibri
To help us troubleshoot potential problems on your Kolibri server, locate and send us the KOLIBRI_HOME/performance/date_time_performance.csv file.
Profile Server Requests
If you have the [Server] section of the OPTION.INI file configured with PROFILE = 1, the above command will additionally perform a profile of every request made by Kolibri server, and save the results in a second log file as KOLIBRI_HOME/performance/date_time_requests_performance.csv
Each log line contains this information:
- Timestamp
- Request path
- Time spent processing the request
- Memory (in KB) used by the Kolibri process when the request came in
- Memory (in KB) used by the Kolibri process when the response was sent
- CPU percentage used by the Kolibri process when the request came in
- CPU percentage used by the Kolibri process when the request was sent
- Flag indicating if the request is the slowest one since the analysis started
Warning
Profiling server requests can consume a lot of computer resources, and potentially slow it down. For this reason you need to explicitly allow it in the option.ini file. Without the PROFILE = 1 key, server requests will not be profiled, and the second CSV file will not be created.
Troubleshooting
Troubleshoot Network Issues
Can you access Kolibri when you type
http://127.0.0.1:8080in the address bar of the browser?Can you access anything from the external IP of the device running Kolibri FROM the device itself? Read more information about IP addresses.
Can you ping the external IP address from another device on the network? For example, if Kolibri is on a device/computer with IP address
192.168.0.104, type this in the Terminal or Command prompt:ping 192.168.0.104
Firewalls
If you are having trouble connecting to Kolibri from other computers, your firewall might be blocking access.
Windows systems often come with firewalls bundled and enabled, and this may interfere with running Kolibri. That said, you probably want to keep your firewall enabled for security reasons, especially if the server is connected to the public internet.
You can try temporarily disable your firewall to see if it helps with connecting to Kolibri. If so, you’ll want to turn the firewall back on and then create a exception rule for Kolibri to allow access.
Troubleshoot Database Issues
In case you receive the database disk image is malformed error in Terminal, try running these commands (note that you must have the sqlite3 command available on your system).
sqlite3 ~/.kolibri/db.sqlite3 .dump | sqlite3 fixed.db
cp fixed.db ~/.kolibri/db.sqlite3
For further assistance, please report the issue on our Community Forums, stating the operating system and Kolibri version.
Videos are not playing
Make sure to check the system requirements to see if you can support video playback. Please report any issues on our Community Forums, stating the operating system and browser you are using.
Problems with import and export from USB drives
Kolibri needs read and write access to USB drives in order to import and export content. There are several possibilities why you may encounter issues during this procedure.
- User account does not have access:
- you installed Kolibri in your own environment running as a non-desktop user (for instance UWSGI)
- you have upgraded Kolibri on Debian from a version prior to v0.10. Follow these instructions to change the ownership of Kolibri system service from one user account to another
- to grant access to USB drives to other accounts, refer to the documentation of your operating system
- Write access denied: Some USB drives will experience problems when they are unplugged from the computer in an “unclean” way. If you are denied access to write, look for options to “fix” or “repair” the file system.
- Data failures: Copying the data can take a long time. If you do not see the final success confirmation message after the copy apparently finishes, do not assume that the data has been imported or exported correctly. Restart the process instead, otherwise you risk inconsistent and malfunctioning content data.
- Hardware life expectancy: SD and flash storage drives can “expire”. Reading and writing large quantities of content data, especially on older or models with smaller capacity, may produce data errors over time.
Locate Kolibri log files
When you report a problem with Kolibri, we may ask you to send us Kolibri log files to help us find out why is it not working or crashing.
Open the .kolibri folder inside the Home folder of the device where Kolibri is running and locate these two files:
kolibri.logdebug.log
Warning
On Linux and MacOS systems you will need to activate the Show Hidden Files option in your file browser, in order to view the .kolibri folder.
About IP addresses
127.0.0.1IP address, orlocalhost, is device’s own IP address. You can use it in the browser on the device where Kolibri is running to make sure it is working correctly.- Aside from its own localhost address, a device running Kolibri also has an external IP address like
192.*.*.*or10.*.*.*, under which it is recognized by other devices in the same local network. That is the IP address that you need to use in the browsers on client devices (learner tablets or computers), to connect with Kolibri server. - Kolibri by default runs on the port number
8080, but you can change this setting to meet your particular needs. - So when you type the full IP address like
http://192.168.1.1:8080in the browser of a client device, you are telling it to: “Connect to IP address192.168.1.1on port8080with the HTTP protocol, and display its content”.