Coach your Learners in Kolibri
You can track progress of the Learners, create and assign Lessons and Exams to classes or learner groups from the Coach dashboard. The default view of the Coach dashboard presents the list of Classes with their assigned coaches, and the number of learners enrolled in each class.
Click on a class to access the progress-tracking features and create lessons and exams.
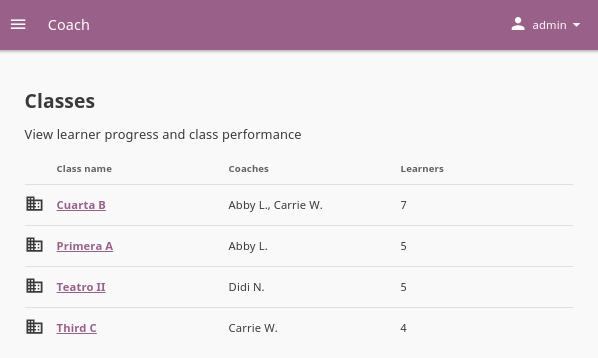
Choose one of the classes from this view to access the learner reports
View Learner Reports
Click the desired class inside the initial view of the Coach dashboard, and it will open the Learners tab (Learners icon). Here you can see the list of learners enrolled in the class, and the group they are assigned to (if applicable).
When you click the username of a learner, you will see a list of content channels they accessed, and the last time they were active on each of them:
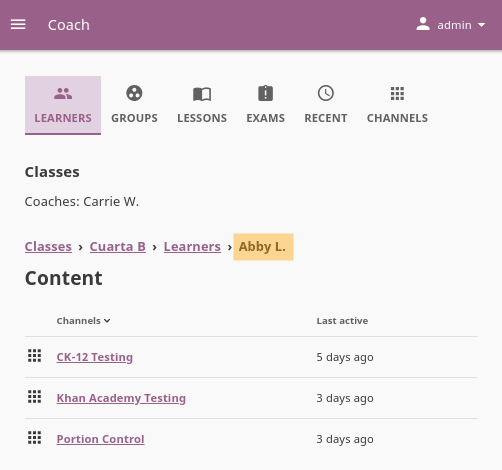
Learner Reports present a quick view of all the content channels accessed by a learner.
Note
In a Learner report, the username of the selected learner will be the last item in the breadcrumb navigation menu.
Navigate the topic tree of each channel to see the progress of the selected learner for the topics, subtopics and individual resources. As you navigate, you will see topics added to the breadcrumbs menu.
In the image below, you can see that the learner Abby L. accessed and completed only one of the subtopics from the topic Addition and Subtraction to 10:
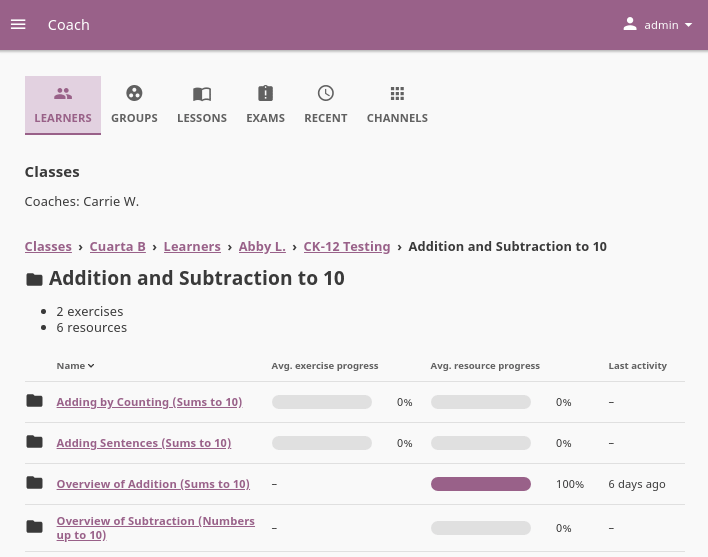
Learner Reports across topics for the selected content channel.
Review Exercise Progress
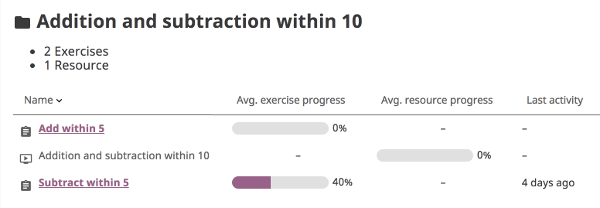
When a learner answers exercise questions in Kolibri, the progress bar below the exercise is taking into account only the most recent given answers, meaning that the learner must complete the required number of correct answers (check marks) in the row for the exercise to be considered completed.
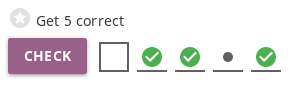
The correct answers (green check marks) in the image above are not in a row; this exercise will be completed only after the learner gives 5 correct answers one after another.
In the example below, the progress bar for the exercise Subtract within 5 displays 40%, because the student has given 2 correct answers within the most recent set of 5 attempts. For example, if this student had made 20 incorrect attempts before the 4 displayed attempts, those 20 incorrect attempts would not get factored into the progress bar.
Click the exercise title to see all the answers and attempts on each question. In the figure below, you can see the progress of the learner Hansen for the exercise Numbers to 120. The exercise is still In progress as the learner has not completed the 5 correct answers in the row. You can also see that for the Question 13, the learner has given the correct answer only on the 4th attempt, which indicates that they are still struggling with the given concept.
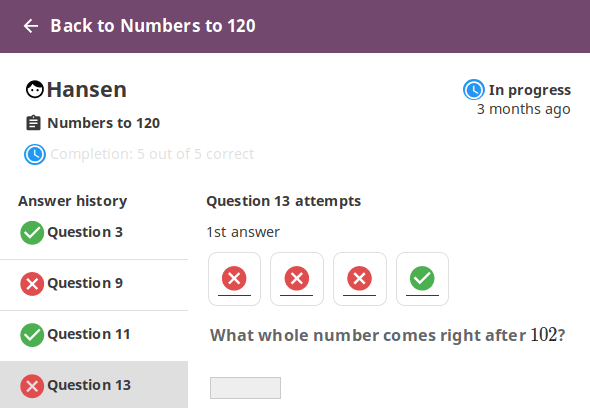
Details for answers and attempts on a single exercise.
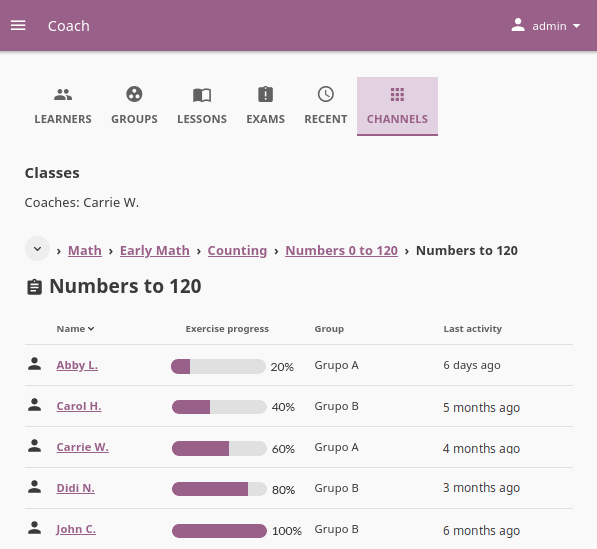
How does it looks if learner A does 5 correct answers in a row on their first try, but learner B gets 10 wrong answers in a row before giving 5 correct ones in a row? In both cases, the progress would show as 100%, and you would have to click each learner’s name to access their progress report and attempt history.
In the figure below, you can see the progress of 5 learners for the exercise Numbers to 120 in ascending order.
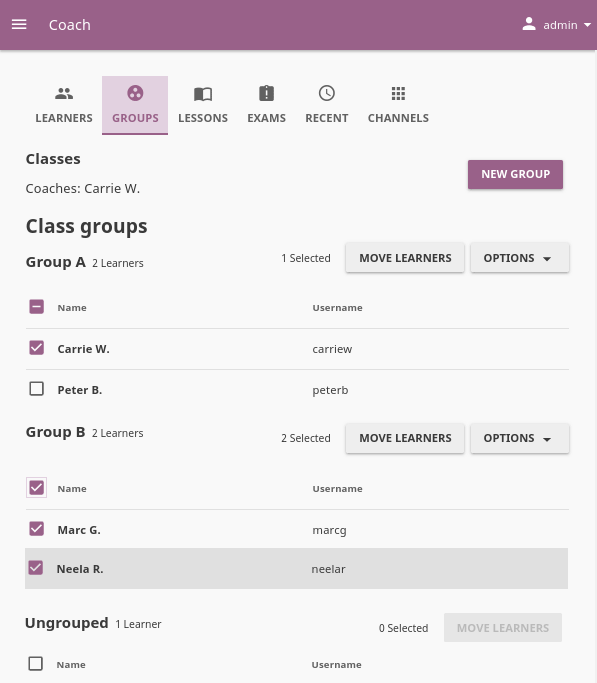
Manage Groups
In case you need to further divide learners inside classes, for example to address the different progress needs, you can use the Groups feature. Create and delete groups, as well as assign learners to them from the Groups tab in your Coach dashboard tab (Groups icon). Default view displays the list of all groups for the selected class, with the list of assigned learners for each group.
Note
To manage Kolibri groups you must sign in as coach, admin or super admin.
Create a New Group
To create a new learner group, follow these steps.
- Click the NEW GROUP button.
- Give group a desired name.
- Click SAVE to confirm, or CANCEL to exit without creating a group.
Assign Learners to Group
Below the existing groups there is a list with all learners currently NOT assigned to any groups.
Use checkboxes to select all the learners in the list, or specific ones you want to assign to the group.
Click MOVE LEARNERS on the right side of the list.
Select the group to which you want to assign the selected learners in the Move learners window.
Click MOVE to proceed, or CANCEL to exit without assigning.
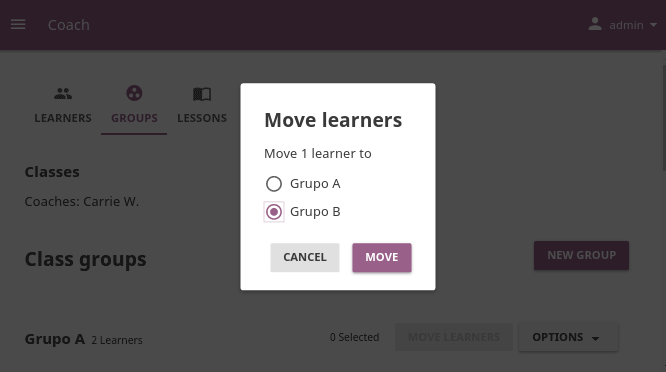
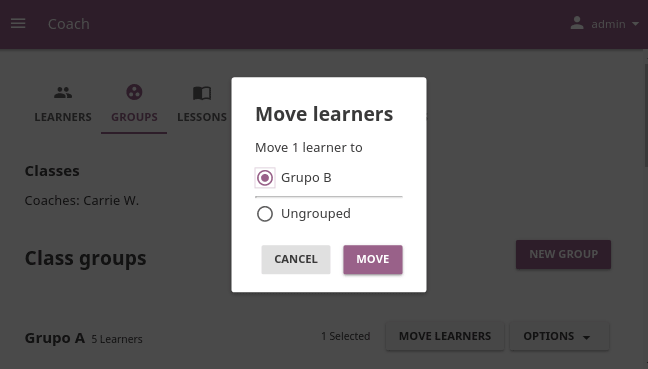
Move learners between groups
Use checkboxes to select all the user in one group, or specific users you want to assign to another group.
Click MOVE LEARNERS on the right side of the origin group.
Select the group to which you want to move the selected learners, or the Ungrouped option if you want to remove them from the origin group without assigning to a new one.
Click MOVE to proceed, or CANCEL to exit without moving.
Rename Group
To rename group, follow these steps.
- Click OPTIONS button on the right edge of the desired group.
- Select the Rename option.
- Input the new name for the group in the confirmation window.
- Click SAVE button to proceed, or CANCEL to exit without renaming the group.
Delete Group
To delete a group, follow these steps.
- Click OPTIONS button on the right edge of the desired group.
- Select the Delete option.
- Click DELETE button in the confirmation window to proceed, or CANCEL to exit without deleting the group.
Note
Learners currently assigned to group will become ungrouped.
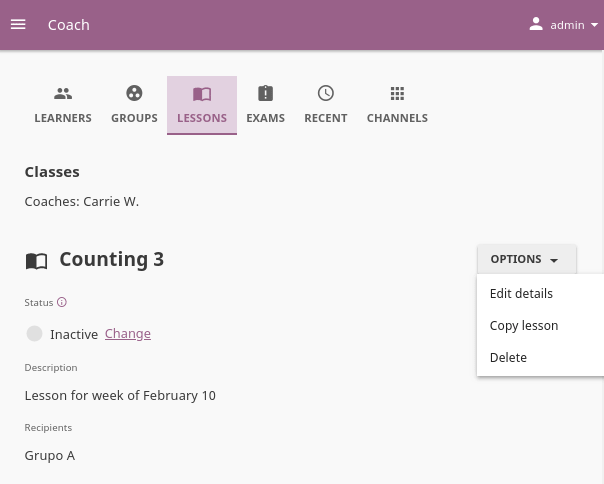
Manage Lessons
Kolibri Lessons offer you the possibility to prepare smaller selections of available learning resources and assign them to learners on a temporary basis. You can select resources from multiple channels, and copy the created lessons to other classes or groups as needed.
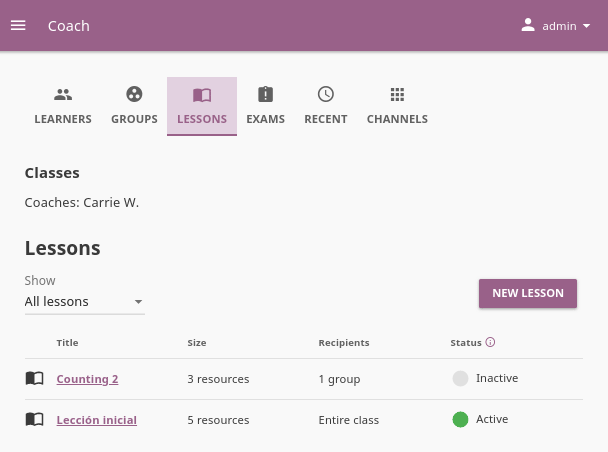
To view, create or delete lessons, as well as assign them to learners, use the Lessons tab in your Coach dashboard tab (Lessons icon). Default view displays the list of all lessons created for the selected class, the number of resources they contain, groups they are assigned to, and their status indicator. You can filter the lessons in order to see all, or just active/inactive ones.
Note
To manage Lessons in Kolibri classes and groups, you must sign in as coach, admin or super admin.
Create New Lesson
To create a new lesson, follow these steps.
- Click the NEW LESSON button.
- Fill in the field for the lesson title, description and choose the group(s) or the entire class as the recipients.
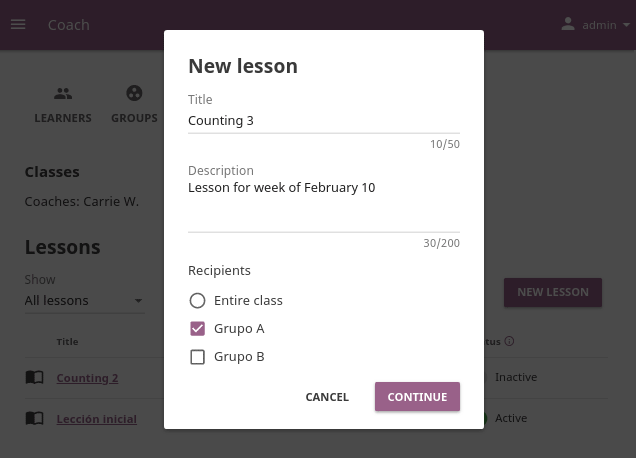
- Click CONTINUE. In this step, the lesson does not have any learning resources yet, but you can see and edit some options.
- Click MANAGE RESOURCES and select the content channel from which you wish to select resources for the lesson.
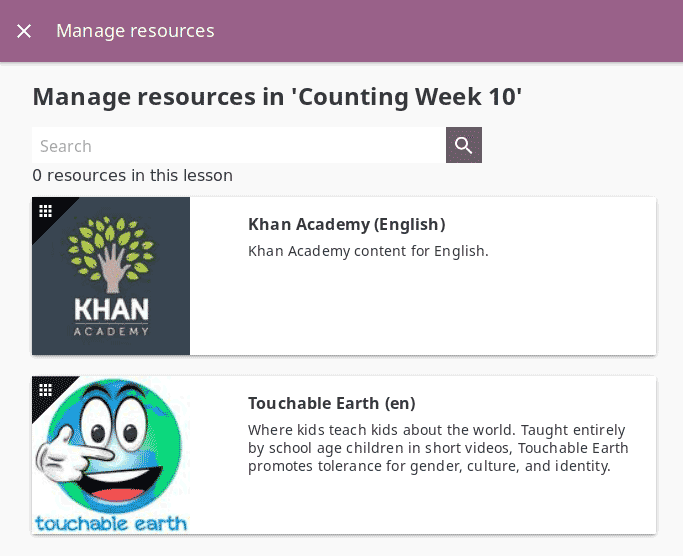
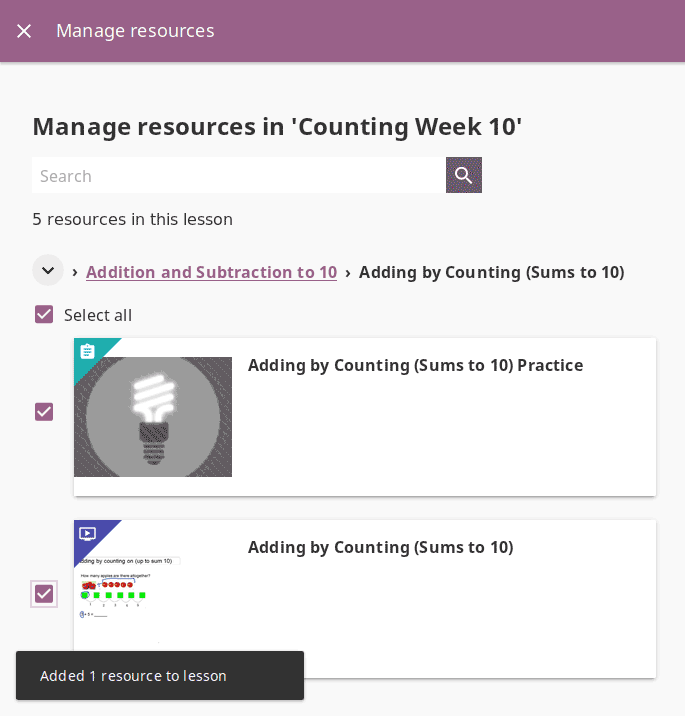
- Keep navigating the topic tree of the selected content channel until you arrive to single content items. Use the checkboxes to select the resources you want to include in the lesson, and you will see a notification at the bottom of the page that the resource has been added.
- Use the Search feature to look for resources about a specific subject. Write the search term in the field, and press the ENTER key or click the Start search button to display the results.
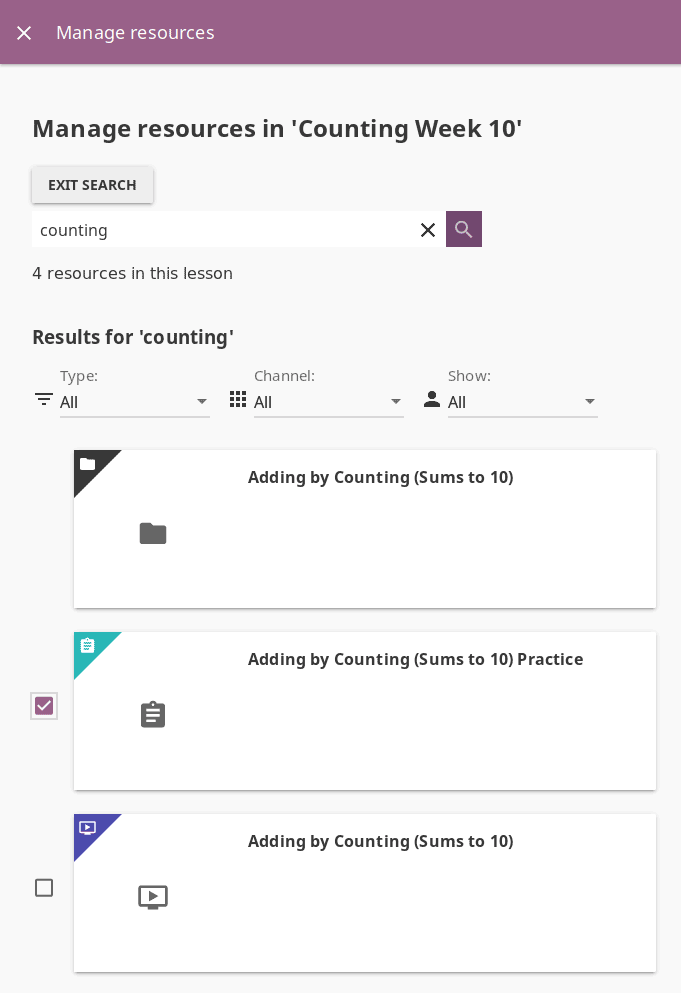
You can filter the search results by type of resource (video, document, exercise…), include only those from a specific channel, or exclude resources for coaches.
- Close the Manage resources window when you finish to return to the main view of the lesson.
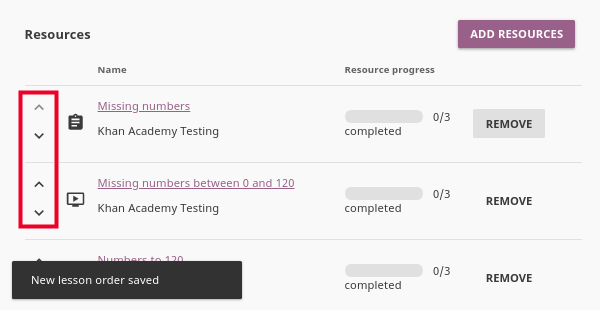
- Use the Arrow up and Arrow down buttons to reorder the resources in the lesson, and click the REMOVE to delete them. You will see a confirmation notification at the bottom.
- To add more resources to the same lesson and keep editing if needed, follow the steps 4 to 9 again.
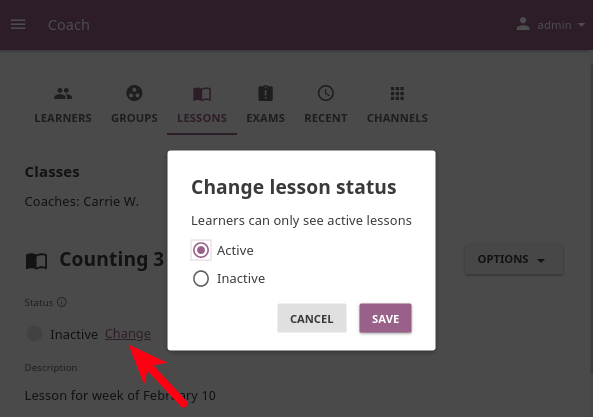
Change Lesson Status
A newly created lesson is Inactive by default, meaning that learners will not see it in their Learn view. To change the lesson status, follow these steps.
- Click the Change link under the Status heading.
- Select Active or Inactive.
- Click SAVE to confirm, or CANCEL to exit without change.
Change Lesson Visibility
You can change the visibility of the lesson that you set when you initially created it. To reassign the lesson to a different group, or entire class, follow these steps.
- Select the desired lesson from the list in the Lessons tab.
- Click OPTIONS and select Edit details.
- Select Entire class or the group(s) of learners to whom you wish to assign the lesson under the Visible to heading.
- Click SAVE to confirm, or CANCEL to exit without change.
View Lesson Progress
After activating the lesson and making it available for the learners, you can view the cumulative progress for each resource in the main lesson view. Click the title of a specific resource to see the progress by all the learners to whom it was assigned.
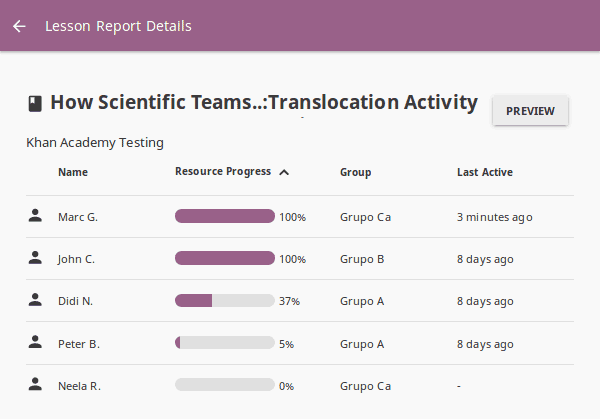
Click on the column headers to order the results by name, progress, group or the time the resource was accessed.
Copy Lesson
To copy a lesson to a different group or another class of your facility, follow these steps.
Select the desired lesson from the list in the Lessons tab.
Click OPTIONS and select Copy lesson.
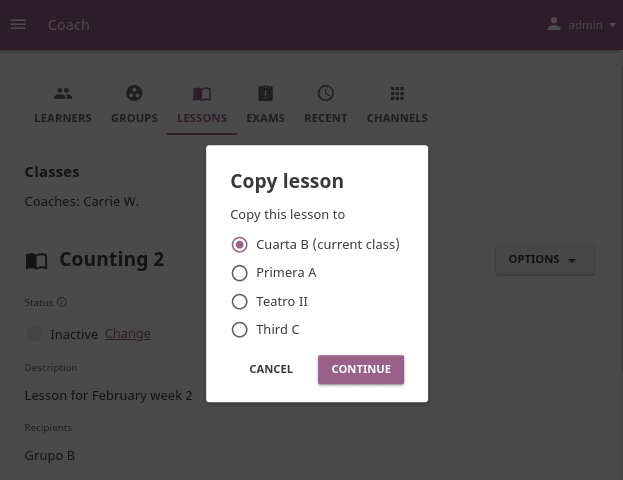
Select the class to which you wish to copy the lesson to.
If the destination class has more than one group, select Entire class or the group(s) of learners to whom you wish to assign the lesson.
Click SAVE to confirm, or CANCEL to exit without change.
If the lesson is copied to another group in the same class, it will appear in the Lessons tab as the Copy of…. Follow the steps in the next heading to rename it.
Rename Lesson
To rename a lesson, follow these steps.
- Select the desired lesson from the list in the Lessons tab.
- Click OPTIONS and select Edit details.
- Change the lesson title in the confirmation window.
- Click SAVE to confirm, or CANCEL to exit without renaming the lesson.
Delete Lesson
To delete a lesson, follow these steps.
- Select the desired lesson from the list in the Lessons tab.
- Click OPTIONS and select Delete.
- Click DELETE in the confirmation window to proceed, or CANCEL to exit without deleting the lesson.
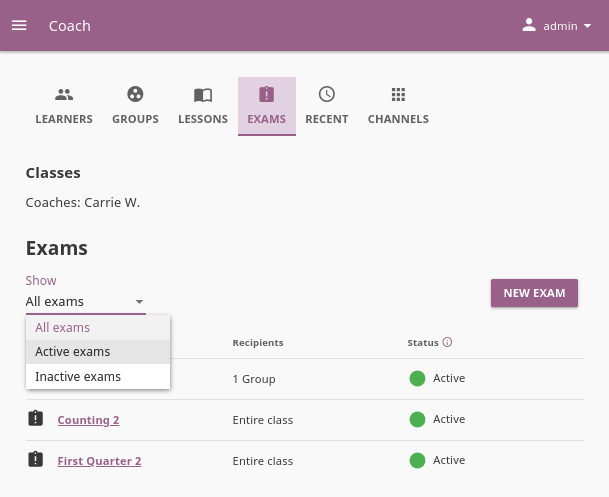
Manage Exams
You can view, create and delete exams, as well as assign them to learners, using the Exams tab in your Coach dashboard (Exams icon). Default view displays the list of all exams in a selected class, with indicators of their visibility status and groups they are assigned to.
Note
To manage Exams in Kolibri classes and groups you must sign in as coach, admin or super admin.
Create New Exam
To create a new exam, follow these steps.
Click the NEW EXAM button.
Fill in the field for the exam title in the Create a new exam page.
Fill in the field for number of questions you want the exam to contain.
Navigate through the topic tree and activate checkboxes of those exercises you want to include in the exam.
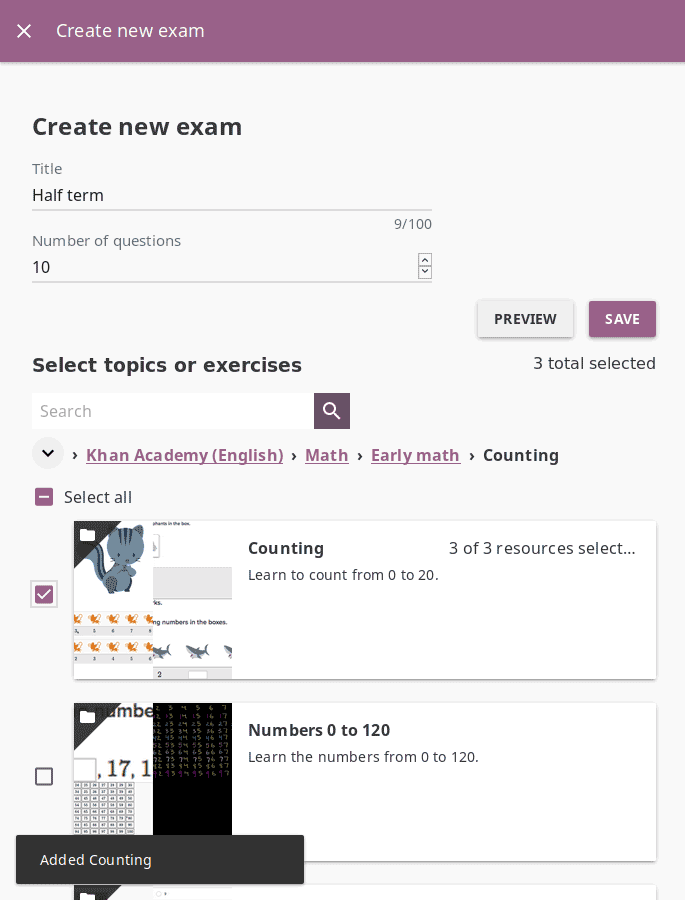
As you keep adding the exercises you will see confirmation messages at the bottom.
Use the Search feature to look for topics and exercises about a specific subject. Write the search term in the field, press the ENTER key or click the Start search button to display the results.
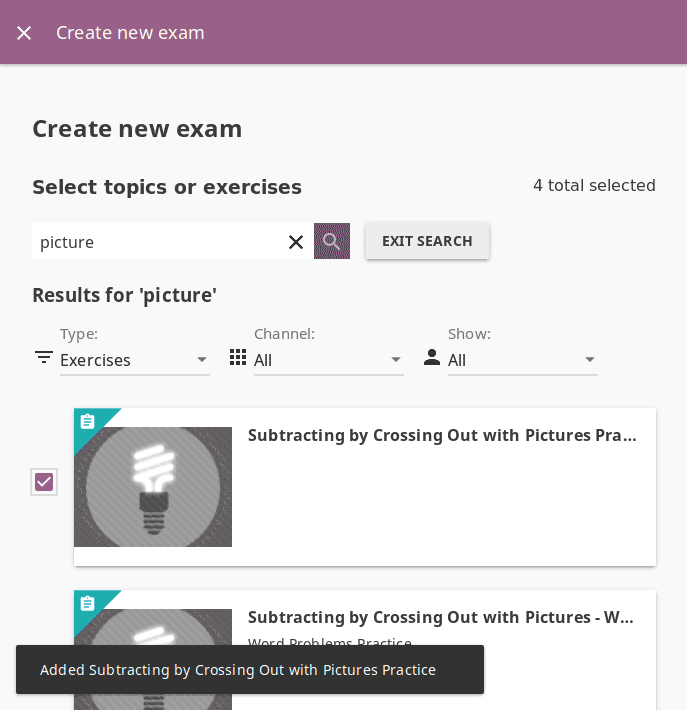
You can filter the search results by type of resource (exercise or topic), include only those from a specific channel, or exclude resources for coaches. Click Exit search to return to main exam view.
Click PREVIEW to view the exam before finishing.
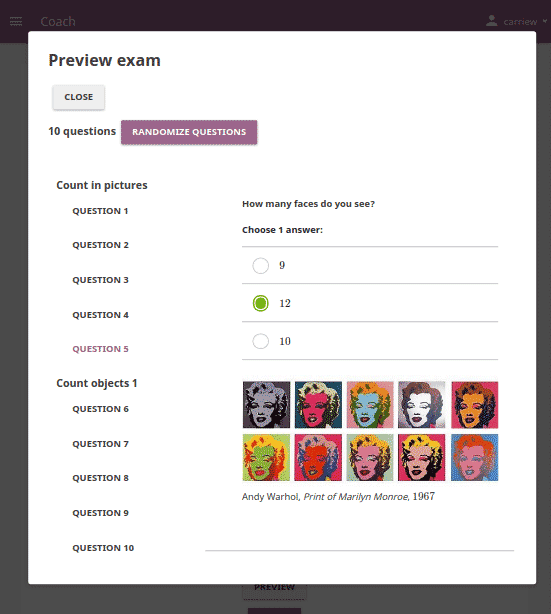
- Click RANDOMIZE QUESTIONS to present them in the different order from those in the topic origin.
- Click CLOSE to return to the exam home page.
- Click SAVE button to finish. You will see a confirmation notification at the bottom.
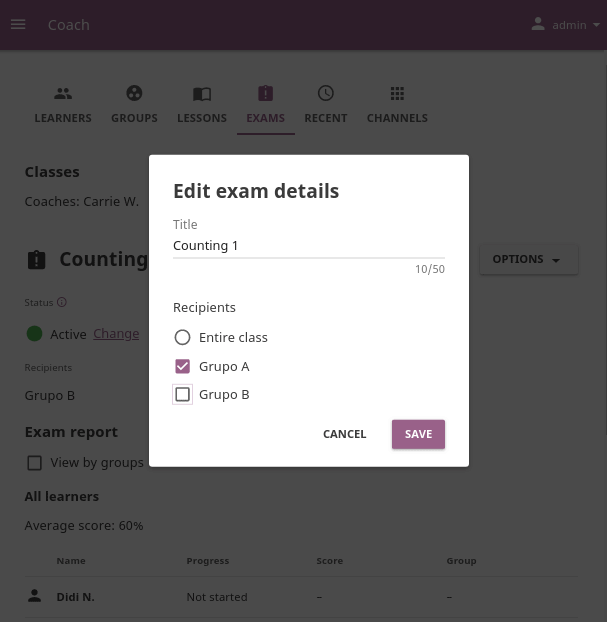
Change Exam Visibility
Newly created exam will be visible to entire class by default. To change exam Recipients (a select group of learners instead of the whole class), follow these steps.
- Select the exam by clicking its title from the exam list.
- Click OPTIONS and select the Edit details option.
- Select the group(s) of learners to whom you wish to assign the exam under the Recipients heading.
- Click SAVE to confirm, or CANCEL to exit without change.
Change Exam Status
Once you set the visibility of exam to the chosen group(s) of learners, you need to Activate it in order for it to appear in the Learn view of the learners to whom you assigned it.
- Select the desired exam from the list in the Exams tab.
- Click the Change link under the Status heading.
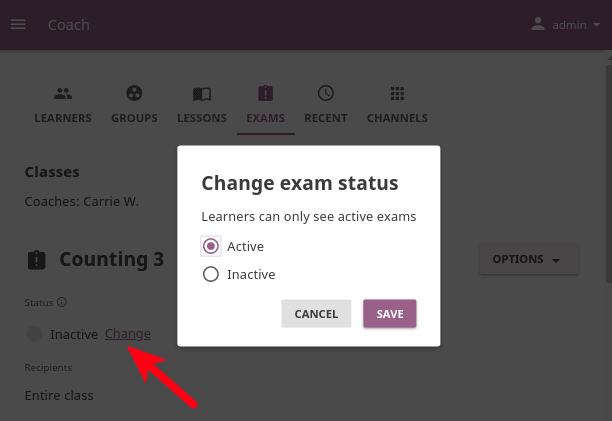
- Select Active at the start of the exam period. When the exam period concludes, select the Inactive option.
- Click SAVE to confirm, or CANCEL to exit without change.
View Exam Report
To view the report and scores for learners who have taken the exam, follow these steps.
Select the desired exam from the list in the Exams tab.
Scroll down to the Exam report heading. This view presents the list of all the learners who had access to the exam, with the respective progress and scores. Click the name of the learner to view the detailed exam report with a preview of the results for each question.
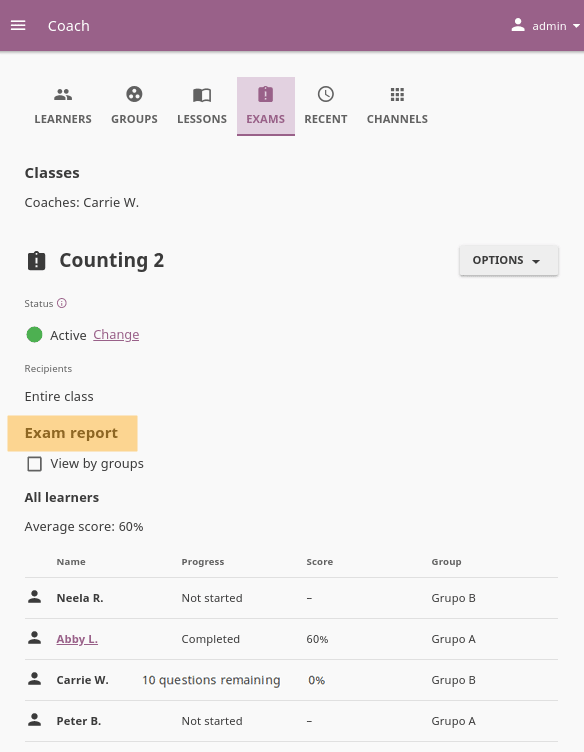
Click each of the questions to preview it. This can help understand which questions learners had difficulties answering correctly, and how many attempts they used.
yellow star icon indicates a completed exam
blue clock icon indicates the exam is in progress, but not submitted yet
green check mark icon indicates the correct answer
red X mark icon indicates the incorrect answer
gray X mark icon indicates an unanswered question
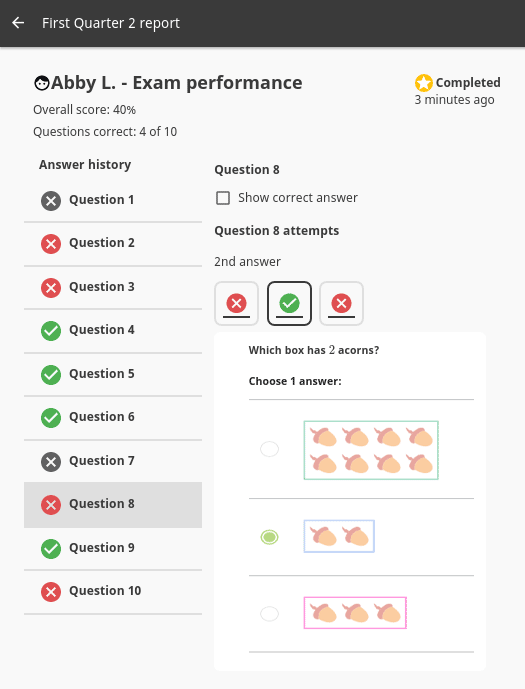
Click on the attempt icons to see the answers for each one. In the screenshot above learner Abby L. had 3 attempts on Question 8: the first one was incorrect, the second one (selected) was correct, but the third and finally submitted one was incorrect.
Copy Exam
To copy an exam to a different group or another class, follow these steps.
Select the desired exam from the list in the Exams tab.
Click OPTIONS and select Copy exam.
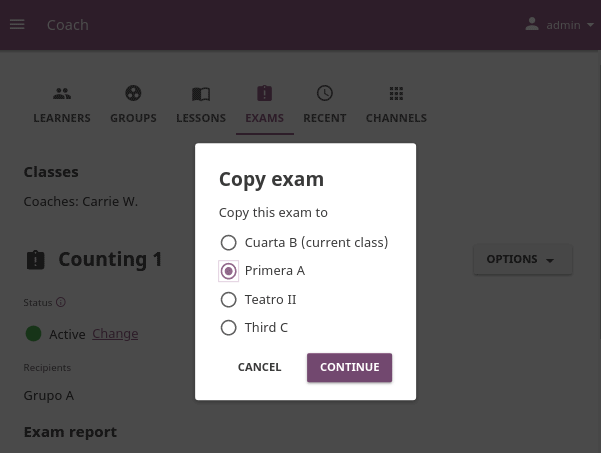
Select the class to which you wish to copy the exam to and click CONTINUE.
If the destination class has more than one group, select Entire class or the group(s) of learners to whom you wish to assign the lesson.
Click SAVE to confirm, or CANCEL to exit without change.
If the exam is copied to another group in the same class, it will appear in the Exams tab as the Copy of…. Follow the steps in the next heading to rename it.
Rename Exam
To rename exam, follow these steps.
- Click OPTIONS for the desired exam and select Edit details option.
- Change the exam title in the confirmation window.
- Click SAVE to confirm, or CANCEL to exit without renaming the exam.
Delete Exam
To delete exam, follow these steps.
- Click OPTIONS for the desired exam and select Delete option.
- Click DELETE in the confirmation window to proceed, or CANCEL to exit without deleting the exam.
Warning
All data from the exam you are deleting will be lost.
View Class Activity
Recent Class Activity
Use the Recent tab (Recent icon) to access a report of channels and items (exercises and resources - videos, reading material, etc.) accessed during the last 7 days by learners of the selected class.
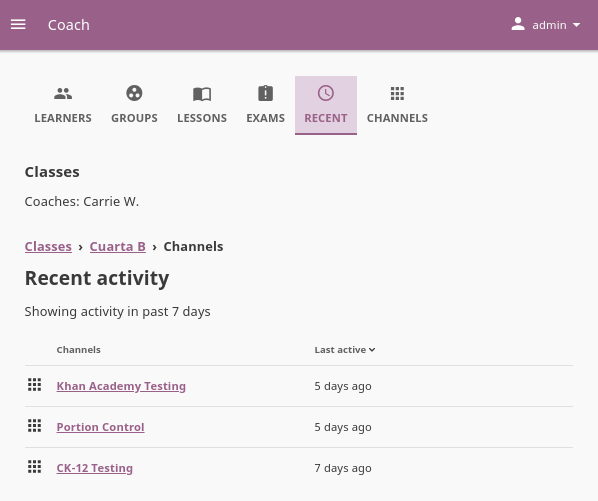
If the enrolled learners have access to more than one channel, you will see the list of channels firstly. From there, you can navigate by topics and subtopics until you arrive to a specific item. In the item’s view, you can review the progress of each learner in the class that accessed the item.
Class Activity by Channels
Use this tab (Channels icon) to access the full report of activity progress for the selected class. You can navigate channels by topics and subtopics until you see the progress of each class learner for a specific item.
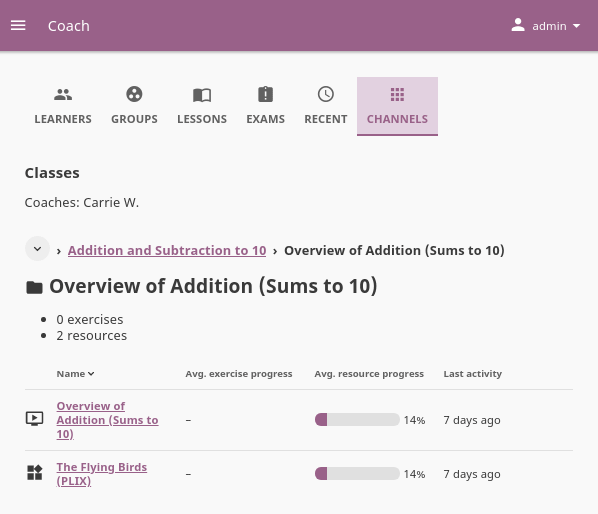
When you navigate to the last level in the topic tree, you can see the average progress of all class learners for each exercise or resource (video, document, HTML5 activity) in that particular topic.
Coach Support Resources
Kolibri Studio supports the option to set visibility for any resource added to content channels as a Coach resource. When content curators set the visibility this way, the resource in Kolibri will not be visible to learners, but only to admins, facility coaches, or other users assigned to coach classes. These materials can be lesson plans, professional development readings, training materials, etc. only viewable by coaches and not learners.

Setting the visibility of content in Kolibri Studio.
Coach resources and content channels that contain them are marked with the Coach resource icon in Kolibri.
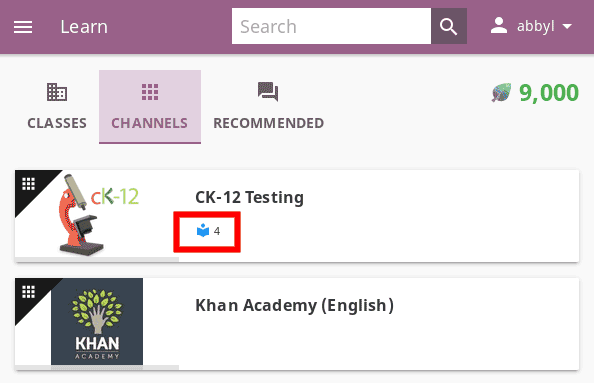
Content channel with 4 support resources for coaches in Kolibri.